• Skip to primary navigation
  • Skip to main content
  • Skip to primary sidebar

My Obstacle Course: Engage, Encourage and Empower

A fun, structured, systematic way to work on your child's strengths and weaknesses at home!

  • Welcome to My Obstacle Course!
  • What is My Obstacle Course?
  • Developmental Timelines
    • What Is My Child Ready For?
  • About Us
  • Blog
  • Contact Information

Search Results for: dropper

My Obstacle Course Kit Item #5: Droppers, Bulb Syringes and Turkey Basters

Droppers, Bulb Syringes and Turkey Basters

Dropper, Bulb Syringe and Turkey Baster

These items are great to have in a My Obstacle Course kit because they add fun and build hand muscles with hardly any set up – just add water and some bowls or cups and you are good to go!

They also help to build some other skills, like planning, patience and focus (in a way that I found was tolerable for Andrew 🙂 ) because for it to work, the child has to do several things:

  • squeeze the top
  • hold it squeezed while putting the bottom in the liquid
  • release the bulb slowly to allow the liquid to get sucked into the tube.

These muscles also have to work to squeeze the liquid back out. He learned pretty quickly how to do it to get the most liquid and would talk to himself about how it worked and what he was going to have to do next time. (Andrew: “Oh, not a lot. Try again and get some more next time. Hooray! Look at all the water!”)

I found a package of droppers (I think 12) at my local teacher store and I do find that having more than one is helpful. The bulb syringe was something that was left over from when Andrew was a baby. They also sell these as part of ear cleaning kits. Look no further than your kitchen drawers to find the turkey baster, however, I did buy a separate one for Andrew’s use (really inexpensive one from the grocery store) to keep with my other station materials.

Uses:

  • making different colors when combined with colored water
  • transferring water from one container to another in order to fill it to a certain level
  • squirting water on something (putting out fire blog post)

Past Posts Using These Items:

  • Droppers
  • Bulb Syringe
  • Baster

Adding any of these items to a My Obstacle Course kit is a super easy way to encourage experimentation with water while also helping to build muscles that will help with handwriting. I love things that make this fun!!

Engage, Encourage and Empower!
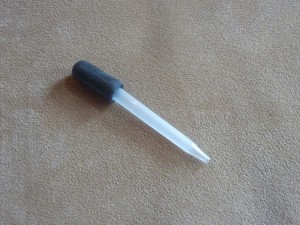


Droppers

Unexpected Find = Fun, Engaging Activity

I was wandering through the aisles of my teacher supply store and saw a package of these droppers in the science section.

Dropper found in the Science section of my teacher supply store.

I thought that they would be great to introduce a little bit of experimentation while also building his grasping skills.

Using same fingers as tweezers...
to build fine motor, squeezing skills.

My Obstacle Course Station Activity: Experimenting with Color

When teaching kindergarten I always loved teaching about the primary colors (red, yellow and blue) and how to use them to make the secondary colors (orange, green and purple).  The children were always so excited and amazed as though I were a magician magically creating different colors right before their eyes!

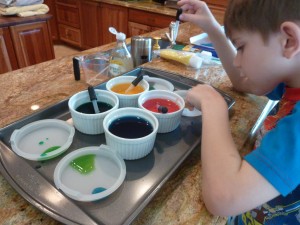
I decided that I would set up a My Obstacle Course station that would combine the droppers with making colors. This station activity was not only easy to set up and take down, it was also a huge hit!  Andrew’s exact words were, “This is fun. It is just like Easter!”

My Obstacle Course Station Set Up:

  • droppers
  • food coloring
  • 3 small bowls, cups or ramekins with some water
  • 3 small bowls, cups or ramekins that are empty
  • rimmed cookie sheet to catch spills
  • paper towel or old towel to wipe spills and hands

I used one of my rimmed cookie trays (I have to use them for something since I don’t bake!!), some ramekins (If you worry about breaking the ramekins, you could also use small Dixie or plastic cups or bowls.) and added a few drops of red, yellow and blue food coloring in: red, yellow and blue food coloring. I did this part with Andrew so he could also work on stirring but you could do this for them or ahead of time.  It is kind of cool for them to see the water take on the color of the food coloring drops.

We talked about the colors we were seeing as we added and stirred the food coloring. I told him he was going to use the dropper to get some colored water from one bowl, squeeze it into an empty bowl and repeat with a different color.

These are some questions I asked him as we were doing this:

  • What do you think is going to happen?
  • What color is going to be in the new bowl?
  • Which colors combine to make new colors?
  • What happens when you add more of one color?
Dropper in and squeeze! Look at his focus!!
Checking out the blue liquid in the dropper.
Checking out and commenting on the color he had made.

He used the droppers to combine red and yellow to make orange, yellow and blue to make green, and red and blue to make purple. He had a ball experimenting with these colors and had no idea that he was building skills like motor planning, fine motor grasping skills as well as going through the scientific method by questioning, predicting, experimenting and making conclusions based on his personal experience with the materials. All of that AND he was totally engaged and having fun with me.

Engage, Encourage and Empower!

Sample My Obstacle Course Using Kit Items

I hope you have found these past posts on what I would include in a basic My Obstacle Course kit helpful. These are just some of my favorites and are examples of items that could easily be assembled to provide activities to help build your child’s skills. I encourage you to go on a little treasure hunt through your own house and see if there’s anything else you can find. (Click here for a past post on Treasure Hunting At Home.)

Academic and Developmental Skill Areas

Just like when I set up My Obstacle Courses for Andrew, I include things to build a variety of academic and developmental skills. The areas I focus on are:

  • Literacy
  • Math
  • Fine Motor
  • Gross Motor
  • Oral Motor
  • Sensory
  • Problem Solving
  • Social Skills

Sample My Obstacle Course

With the kit items I have given you, below is a sample My Obstacle Course. Please remember that the MOST important thing to remember is to provide activities that YOUR child is ready for at the level they are ready for, regardless of their age. These activities can be modified up or down in difficulty so keep that in mind.
  1. Pass the question beach ball back and forth 5 times, asking and answering questions based on the question word in front of you when caught. (Social Skills and Gross Motor)
  2. Crawl through the fabric tunnel. (Gross Motor and Sensory)
  3. Unscramble the scrabble letters to make words that go along with clues. (Literacy and Problem Solving)
  4. Write the words you’ve made with the scrabble letters on the lined write on/wipe off board. (Literacy and Fine Motor)
  5. Crawl through the collapsible tunnel or under three chairs lined up (3 is just an example number!). (Gross Motor)
  6. Roll one die and use the tweezers to move that many puffs. Repeat with the other die and then count how many puffs in all. (Click here for a post on Easy Math Organizers with a description of this activity minus the tweezers and click here for a post on Tweezers with puffs.) (Math and Fine Motor)
  7. See how many different shades of blue you can make using the droppers and colored water. (Different Shades of Blue) (Fine Motor and Problem Solving)
  8. Clothesline clipping- matching up addition equations with their sums. Look at the equation clipped on the clothesline and find the sum. Clip them together and move onto the next equation. (This could be done easily using equations and sums written on index cards or pre-made flash cards with sums written on cards.) (Math and Fine Motor)
  9. Puff Blowing- Blowing puffs (with mouth or straw) off of a counter into a cup or bowl. (Puff Blowing) (Oral Motor)
This is just an example to show how easy it is to set up a basic My Obstacle Course using these kit items.
My next post will be on my favorite go-to station activities that are easy to make and adapt to different skills and levels.
Engage, Encourage and Empower!

My Obstacle Course Kit Item #6: Food Coloring

My Obstacle Kit Item #6: Food Coloring

When thinking about how to make activities fun in order to make building more challenging skills exciting, I thought back to teaching my “Colors” unit in kindergarten. The students loved experimenting and learning how different colors are made. I started using food coloring in My Obstacle Course station activities with Andrew and got to see the same look of wonder and joy as he saw firsthand what happens when two colors blend together. So easy and so fun!!

Food Coloring

Uses:

  • drops of color into water combined with droppers, bulb syringe or turkey baster to build fine motor skills while experimenting with color
  • drops of color into shaving cream or frosting to build hand and arm muscles by mixing with spoon

Sample Activities:

These are all pretty straight forward station activities. Click here for a food coloring post search from my website but these photos give a good idea of how we have used food coloring to add some color to station activities aimed at building hand muscles and muscle control.

My Obstacle Course Station Activity: Adding food coloring to make orange shaving cream for autumn themed shaving cream writing station

Food coloring + shaving cream

My Obstacle Course Station Activity: Color fun with droppers

Droppers and Colored Water

My Obstacle Course Station Activity: Use hands to squeeze bag so frosting mixes and makes it colored

Frosting in a Ziploc bag with food coloring added. He had to squeeze and press out the frosting so the color would spread.

My Obstacle Course Station Activity: Use spoon to mix and make the frosting turn green

Making green frosting for March themed My Obstacle Course.

My Obstacle Course Station Activity: Pour colored water to fill muffin pan

Working on pouring skills using colored water and heart-shaped muffin pans for February themed course.

These are just some ways we have used food coloring in My Obstacle Courses to make them a bit more fun. Such an easy add in that helps to motivate and inspire experimentation. Have fun!!

Engage, Encourage and Empower!


Different Shades of Blue

In keeping with the summer, beach themed My Obstacle Courses, I’m including a station to use the primary colors to make different shades of blue, like water. This is something that only takes a few minutes to set up but is so fun for children to get to play around with. An activity like this also goes along nicely with building some pretend skills, like pretending to be a scientist experimenting or a magician who is making “magic potions.”

My Obstacle Course Station Activity: Different Shades of Blue

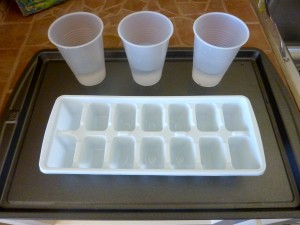
I usually set up a station activity like this near a sink to make it easier to access water for set up and clean up. A rimmed cookie sheet is a perfect “tray” to place below the tools to help catch any stray water or color. I’m all about ease and containing messes :).  I used some clear plastic cups in this particular station but have used ceramic ramekins in past stations and find that those are really helpful if you have children who tend to knock things over, not because they want to, but because they don’t have the hand control. The ramekins are low and heavier than plastic so they don’t tip as easily). I am also using a white ice-cube tray to help the colors stand out even more.

Rimmed cookie sheet, clear plastic cups with water and an ice cube tray.
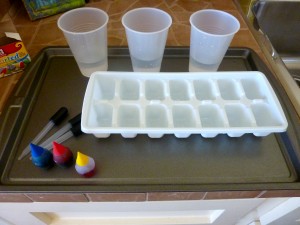
Additional tools of food coloring (red, yellow and blue - the primary colors) and droppers.

I love including droppers with something like this because it also helps to build fine motor skills! (Click here for a past post on droppers.)

Each cup has a different color and it's own dropper.

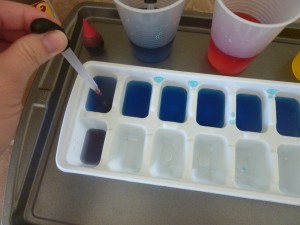
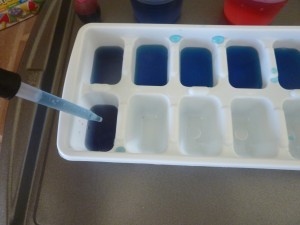
This is where you get to benefit from my experience. I began thinking that I would simply have him use the droppers to fill each section (like shown in the picture below where I had started in the far left corner of the tray) but when I tried it (which I always do before I pass them on to you or try them with him!) it was taking a really long time. I shifted my plan and decided to fill a cup with blue water (also shown below) and fill half of the ice-cube tray with the blue water.

Change in plans!

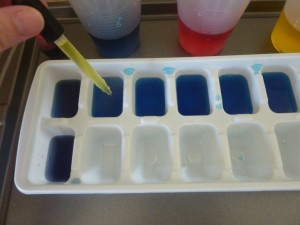
Ahhhhh….much better! Now, I add the colored water to each blue section to make different shades of blue.

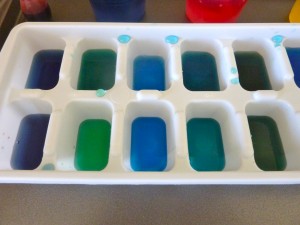
Adding red...
...makes purple-ish water.
Adding yellow...
...makes greenish water.
My different shades of blue!
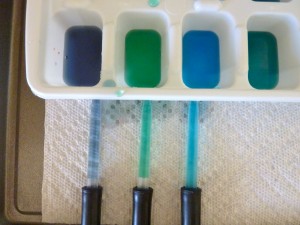
The colored water in the droppers to show the difference.

This was fun for me and is always a huge hit with Andrew! Have fun!!

Engage, Encourage and Empower!

Easy Theme Reinforcers – March

One of the main reasons I came up with My Obstacle Course was to find a way to engage with Andrew at home while doing reinforcement activities for therapies and school. I found that utilizing a theme for each Obstacle Course allowed me to work on skills in all developmental areas while being purposeful and meaningful for him. The themes can range from a general monthly theme to a specific theme that is reinforcing what your child is learning about in school but what they do is help to tie all the different stations together.

Easy Ways To Reinforce A Theme:

I have had many people comment that it must take a great deal of time to prepare the activities and while it does take a little time and preparation (most of which I hope to make easier for you through my posts!), there are so many easy ways to make activities thematic. For example, it is March and so for the entire month (even after St. Patrick’s Day) I use thematic helpers like shamrock shaped calendar cutouts.

Memory Match game made from shamrock shaped calendar cutouts.

I also gather up anything green (or whatever goes with the theme) that I can find that can be used, such as…

  • a green ball or balloon for bouncing, tossing, catching, kicking, rolling, etc.
My Obstacle Course Station Activity: Pass the green ball back and forth 10 times.
  • green ink for my letter stamps
My Obstacle Course Station Activity: Alphabet stamps with green ink.
  • “Green Eggs and Ham” by Dr. Seuss for a reading or listening station activity
My Obstacle Course Station Activity: Read "Green Eggs and Ham" by Dr. Seuss
  • green dice to roll for number identification, addition, subtraction, multiplication – Link to previous post on dice.
  • green markers or crayons for drawing, texture rubbings, letter, number or word writing practice
  • green Duplo blocks for fine motor skill practice by putting them together or pulling them apart
  • blue and yellow food coloring in water to be combined to make green with dropper or baster – Link to previous post on using droppers.

These easy to put together station activities, along with other ideas I share, make it easy to build skills he is ready for in a way that is fun, colorful and kid-friendly. I encourage you to go on a “green” hunt in your child’s toy box, cupboard or closet and you may be surprised at what you find that can be incorporated! Once I began doing that, I realized that I could use toys and tools in ways other than their originally intended purpose. It made things so much easier for me and also more fun for Andrew because while he might recognize the objects, he never knew how I was going to have him use them. I just love ideas that help me use the element of surprise to keep him engaged with me!

Engage, Encourage and Empower!

Primary Sidebar

Obstacle Course Mom’s Blog

  • When People Stare, Mind Your Own Business
  • ABC’s of Peaceful Parenting Tele-class
  • What’s Perfect About This?
  • Exciting News!
  • Halloween

Categories

  • Blog
  • Cool Tool
  • Fine Motor
  • Getting Started
  • Gross Motor
  • Literacy
  • Math
  • My Obstacle Course Station Ideas
  • Oral Motor
  • Problem Solving
  • Sensory
  • Social Skills
  • Uncategorized

Archives

  • July 2012 (1)
  • May 2012 (1)
  • January 2012 (1)
  • November 2011 (2)
  • October 2011 (12)
  • September 2011 (14)
  • August 2011 (15)
  • July 2011 (19)
  • June 2011 (18)
  • May 2011 (21)
  • April 2011 (20)
  • March 2011 (22)
  • February 2011 (19)
  • January 2011 (21)
  • December 2010 (22)
  • November 2010 (6)

Meta

  • Log in
  • Entries feed
  • Comments feed
  • WordPress.org