• Skip to primary navigation
  • Skip to main content
  • Skip to primary sidebar

My Obstacle Course: Engage, Encourage and Empower

A fun, structured, systematic way to work on your child's strengths and weaknesses at home!

  • Welcome to My Obstacle Course!
  • What is My Obstacle Course?
  • Developmental Timelines
    • What Is My Child Ready For?
  • About Us
  • Blog
  • Contact Information

Archives for March 2011

Design and Drill

"Design and Drill" toy

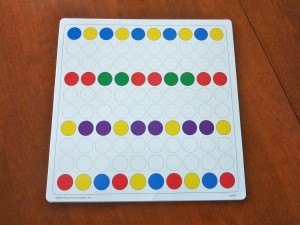
When I first saw this toy I thought it would be a huge hit with Andrew and when he seemed reluctant to play with it I immediately made plans to turn it into a station activity in My Obstacle Course. It is a square with holes to be used with colored screws to create designs or patterns. It comes with an electric drill as well as one the child can use manually. This is a great toy for combining fine motor skills, problem solving and planning along with math skills (patterning).

The colorful screws and drill

The cards that come with the toy range from basic to complex and can take a bit of time to complete. I found that having Andrew make the pattern or picture that was on the card from start to finish was too much and he lost interest when he realized it was going to take a while. I began shortening the activity by either starting a picture or pattern for him to finish or only giving him a certain number of screws to drill in. This helped a ton and was far more motivating to him.

My Obstacle Course Station Activity: Finish the Pattern

Choose colors or a pattern. Begin the row or the pattern and have your child finish the pattern by screwing in the pieces that come next. I like to provide the exact number of pieces that he will need to complete it. Once I saw that he had a good idea of the pattern, I would include an oddball screw to see if he could recognize that it did not belong.

Card with basic rows of different colors
Card with a basic pattern
Rows of patterned screws

My Obstacle Course Station Activity: Make the Same (finishing what is shown on the paper card)

This is the most challenging activity and is something that I found worked best when I began the pattern or picture and provided him with the screws to finish it.

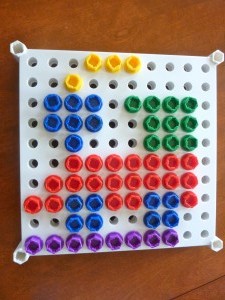
Train card
Andrew's board almost finished (missing two purple screws in the bottom row)!

This is another toy that was purchased for Christmas and was not really played with until I taught him how to do it in a small, structured way. Breaking down the steps into small, manageable pieces makes such a difference! It is now a toy that he understands, enjoys and is more comfortable playing with. Click here for a previous post on new toys not played with.

Engage, Encourage and Empower!


Pastry Brush as Paint Brush

Pastry (or Basting) Brush

I found these bright brushes at Target. I thought that they would be great for painting with while also being super easy to clean. Andrew is not a huge fan of painting and past attempts involving sheets of blank white paper have lasted about 15 seconds. I took that knowledge and decided to make this painting station look very different. I set out these brushes…

Spring Colored Brushes

added a pie tin…

Brushes and Pie Tin

and a plate or cookie sheet underneath (since my tin has holes).

Pastry Brushes, Pie Tin and Paper Plate (to catch spills)

My Obstacle Course Station Activity: Paint Planet Earth

I placed some washable finger paint on the cookie sheet (or on another paper plate if that’s what you are using underneath). I used blue and green paint because he had been learning about the planets in school and the station direction was to paint the planet Earth.

Check out the focus!
Using both hands...interesting 🙂 .
Checking it out closely.
Finished product!

This station activity is really easy to set up and clean up. It was the first time (at home with me) where he was actually willing to paint and I think it really helped him to have a defined space and to know he was expected to cover the whole bottom. A blank white paper can be very intimidating and this was structured enough to make him feel comfortable to be willing to try. He had a ball with this and I enjoyed watching and listening to him as he painted!

Engage, Encourage and Empower!


Practicing Speech Sounds

Most speech pathologists will send home practice pages with words that have the target sound for the child to work on.  If they do not, contact them and let them know that you would like to reinforce what they are doing and would like to stay current on the sounds your child needs to practice. This is particularly helpful if they receive services while they are at school and you are not able to speak with the pathologist each time. Andrew receives his speech therapy after school so I am there and ask his speech pathologist what we should be working on or  I look at the homework paper he gets for practice. While I do not use the homework sheet as she does while working with him, I do take the words and/or sounds and turn them into more of a game.

I Need To Help My Child Practice Skills But They Don’t Want To Work With Me!

One of the reasons I came up with My Obstacle Course is that he didn’t want to work with me and I know I am not alone in this because I hear it ALL of the time. We would come home from our speech session armed with a sheet of pictures that had the sound he was working on and we were expected to practice this.  I don’t know about you, but in my house it looked and felt as though I was trying to wrangle an octopus into a sleeping bag. He wriggled, he yelled, he ran around the room, he would spin things all while I looked for ways to bribe him. Ah, bribery. Then one day I had enough and thought, “This is miserable! There has to be another way!!” And there was…by turning it into a game or station activity played within My Obstacle Course. This helped tremendously because it was part of a larger structure, it had a beginning and an end and he knew what was expected.  It also helped because while I made the activities, it wasn’t coming from me, it was just part of the Obstacle Course.

My Obstacle Course Station Activity: Speech Sound/Word Practice Game


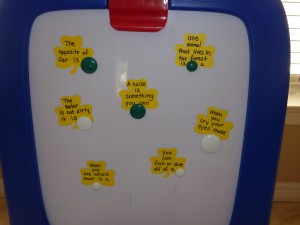
Match the word with its clue and then say the word 5 times.

Station set up:


Make up word clues to go with the speech words or sounds that your child is working on and write them on calendar cutouts or index cards. Place them on the easel under a magnet. (This can also be done on the floor by setting out the clues and having the words in a container.) Write the speech words on cutouts or index cards.  That’s all! Piece of cake. You could also provide a mirror for them if it is helpful for them to see what their mouth is supposed to be doing. (click here for a previous post on using mirrors)

At the station:

Read the clue and find the word that goes with it.  Say the word 5 or 10 times.

What it looks like in our house:

Clues for words with the /air/ and /ear/ sounds, like "chair, care, share" and "hear, deer, tear, clear."
Word matched up with its clue.
Clues for words beginning with /ch/.
Here are the /ch/ words that he was working on.

I really like doing this on the magnetic easel because it is also working on fine motor skills and planning because he has to hold the clue, lift the magnet and slide the word underneath so they are all held on to the surface with the magnet.

It does not take long to make this activity but it makes it so much more fun for both of us to reinforce his speech pathologist.

Engage, Encourage and Empower!


Colored Marshmallow Graphing

I love it when I find something that is fun and inexpensive that can be used in many different ways and the colored marshmallows I wrote about last week are another one of those things!

Here is a My Obstacle Course station activity to build the math skills of graphing and interpreting data with colored marshmallows. This is something that is great because each time you set it up, the results are different. I find that introducing a skill but using different materials that are random really helps to keep Andrew engaged and he learns about the concept and how to apply it with different things.

When I was teaching, I always felt like graphing was a bit too abstract, throwing children into interpreting data from a graph without really knowing where the data is coming from. Depending on the school or teacher, there may be more emphasis on providing opportunities for children to graph things that the they can relate to but an activity like this really allows them to be part of the process from start to finish, being able to move and place each item where it belongs and then answering questions.

My Obstacle Course Station Activity: Marshmallow Graphing

My Obstacle Course Station Activity: Colored Marshmallow Graphing

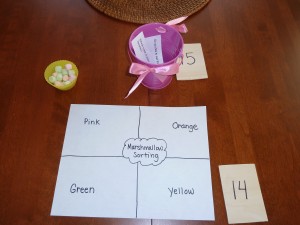
For this station activity, I used a sheet of white printer paper to make my graph, placed some colored mini-marshmallows in a muffin cup and provided some follow-up questions to help build math vocabulary and work on analyzing the data, aka marshmallows.

Colored Marshmallow Graph

When at the station, place the marshmallows in the correct row according to their color. Some children will dump the marshmallows out and then place them randomly. Andrew favors doing it one color at a time. When all of the marshmallows have been placed in the correct row, the graph is complete. I like to talk a little bit about what we notice – Which color have the most? Which color has the least? I also use the question strips that I made for marshmallow sorting. (marshmallow questions) I cut them apart and place them in a bucket so he can pick one question at a time instead of being overwhelmed with a whole sheet of questions. Small thing to do but it makes a huge difference in attention and motivation.

Another simple and easy way to build math skills using something fun, easy to find and inexpensive :).

Engage, Encourage and Empower!
Stir Up Some Fun With Spring Colored Whisks!

I found these colored whisks at Target and besides being perfect for using in a spring themed My Obstacle Course, I realized they would be perfect for building a skill I was working on with Andrew.

Spring colored whisks

If At First It Doesn’t Work, Try Something Different

I had introduced a stirring activity with him (stirring frosting with a spoon) and realized that it was too challenging for him because he didn’t have the hand muscle strength to dig in and move it around. I thought that these whisks would be perfect for him to build his hand muscles while grasping the handles and moving it through something that would provide just a little resistance…water!

This is such a simple activity, and probably one that many of you have done with your children, however as Andrew grew up we never really had those pretending to “make soup” on the kitchen floor with pots and wooden spoons or “splash in the kitchen sink” water experiences. While he loves swimming, bathing and showering, he doesn’t like the possibility of getting wet and having wet clothes on.

(Recent story about to illustrate this…Last week when we went to Morgan’s Wonderland and there was a really cool water experimentation-station. There were lots of spinning parts, which he LOVES, but I could tell he was anxious about getting wet. He even came up to me and said, “Next time I wear my swim suit and swim shirt so I can’t get wet.” In his mind, the rule must be – “It’s okay to be wet in a swim suit.” I showed him the complete change of clothes that I had in my bag and assured him that he could change his clothes when he wanted. This helped tremendously and he was then willing to step in closer and really experiment with some cool things! I will post pictures of him at this station to my Facebook page.)

I have learned to reintroduce things that didn’t work before by making small tweaks, which also gives me a lot of insight as to what is standing in his way or what he is ready to handle at that time.

My Obstacle Course Station Activity: Stirring Water With A Whisk

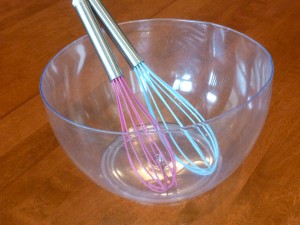
I used a large plastic bowl…

Large plastic bowl

added the whisks…

Whisks and bowl waiting for water

some water and a few drops of food coloring when we got to the station! I also placed a rimmed cookie sheet under the bowl to catch any spills. The food coloring is not essential but I do find that it helps give this activity purpose, especially for someone who needs to see the purpose in doing something before fully engaging.

At first he hesitated, worrying that he wouldn’t be able to do it like he wanted but I could see he was curious about what would happen with the food coloring if he gave it a stir! I began by placing my hand over his so he could feel the pressure necessary to hold the whisk and also to show him how to move it around the bowl.

Stirring the water to make it green.
Really stirring now!

Sometimes you have to look no farther than your kitchen cupboards to help your child build skills. The colorful whisks just add a bit of fun and also keep his tools separate from mine 🙂 .

Engage, Encourage and Empower!


Colored Marshmallow Sorting Station

It was springtime last year and I was on the hunt for things that reminded me of spring to use with Andrew’s My Obstacle Courses. I was in our grocery store, (which is a great place to find fun, thematic materials- especially in the “holiday” aisle and the shelves at the end of the aisle), and my eye caught a package of colored mini-marshmallows. They appealed to me because of their pastel colors, they could be used with tweezers for fine motor skill building and also because there were so many of them, which means that they make great math manipulatives (patterning, counting, sorting, graphing, use with dice for addition and subtraction, grouping for multiplication and division, etc.). For this post, I thought I would share a sorting station we did and the question cards we used after.

My Obstacle Course Station Activity: Colored Marshmallow Sorting

My Obstacle Course Station Activity: Colored Marshmallow Sorting

Station Preparation:

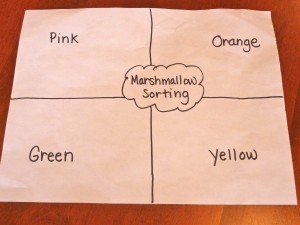
There were four different colors of marshmallows so I divided a sheet of regular white printer paper into four sections, writing the color word in each. I also labeled it “Marshmallow Sorting” because I like things like this to have a title :). You could place this inside of a sheet protector so it stays in better shape than mine!

Sorting Sheet

I typed and printed out some questions for after they were sorted, cut them into question cards and put them into one of my small, spring colored pails. It seems like these cards would be unnecessary since I could just ask him the questions, but for us it makes all the difference in the world when he sees it written out on paper. It’s official My Obstacle Course business for him and not just another pestering question coming from mom.

I poured some marshmallows into one of my colored muffin cups and the station was ready!

At The Station:

When he got to the station, he read the directions, “Sort the marshmallows by color.” He squished them a little bit, smelled them a little bit (which made me realize that he probably hadn’t had much marshmallow exposure before, particularly since my husband and I don’t ever have them around!) and then sorted them. He likes to sort one color at a time but I know other children who sort as they remove items. Interesting to watch!

Once he was done sorting, we looked at the question cards and answered them. You can choose how many questions your child answers or have them “close their eyes and pick” to add some mystery. Here are some questions I wrote out to go with this station: marshmallow sorting questions. I like to incorporate math language in the questions as well ask some questions about personal preferences.

Engage, Encourage and Empower!


Next Page »

Primary Sidebar

Obstacle Course Mom’s Blog

  • When People Stare, Mind Your Own Business
  • ABC’s of Peaceful Parenting Tele-class
  • What’s Perfect About This?
  • Exciting News!
  • Halloween

Categories

  • Blog
  • Cool Tool
  • Fine Motor
  • Getting Started
  • Gross Motor
  • Literacy
  • Math
  • My Obstacle Course Station Ideas
  • Oral Motor
  • Problem Solving
  • Sensory
  • Social Skills
  • Uncategorized

Archives

  • July 2012 (1)
  • May 2012 (1)
  • January 2012 (1)
  • November 2011 (2)
  • October 2011 (12)
  • September 2011 (14)
  • August 2011 (15)
  • July 2011 (19)
  • June 2011 (18)
  • May 2011 (21)
  • April 2011 (20)
  • March 2011 (22)
  • February 2011 (19)
  • January 2011 (21)
  • December 2010 (22)
  • November 2010 (6)

Meta

  • Log in
  • Entries feed
  • Comments feed
  • WordPress.org