• Skip to primary navigation
  • Skip to main content
  • Skip to primary sidebar

My Obstacle Course: Engage, Encourage and Empower

A fun, structured, systematic way to work on your child's strengths and weaknesses at home!

  • Welcome to My Obstacle Course!
  • What is My Obstacle Course?
  • Developmental Timelines
    • What Is My Child Ready For?
  • About Us
  • Blog
  • Contact Information

Sensory

Help the Baby Chicks

This station activity is perfect for a farm-themed My Obstacle Course. All you need are some colored puffs (yellow works great for baby chicks) and some tweezers or ice tongs. I had some brown shredded paper that I placed into a baking pan because I thought it would help in pretending that they were still in their nest. I also had a picture of a hen from a Mailbox Teacher Magazine but you could draw your own (you would laugh if you saw what mine would look like) or simply print one from of the internet.

My Obstacle Course Station Activity: Help The Baby Chicks Get Back With Their Mom

This activity is simple. Have your child use the tweezers to get the baby chicks (one at a time) back to their mom. Since I am always looking for ways to build pretend play, I suggest adding some pretend play dialogue, such as “Oh no! The chicks are still sleeping in their nest and their mom is looking for them. Can you help them get back with their mother?”
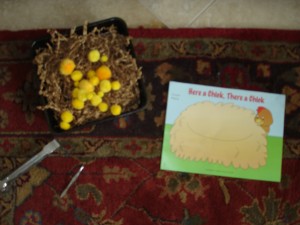
Help the Baby Chicks

Using the tweezers or tongs helps to build hand muscles necessary for handwriting and even eating with utensils. Here is a past post that I did on tweezers.

Engage, Encourage and Empower!
Sand Writing

No beach? No problem! I shared in an earlier post about creating a Sand Bin and how that can be used to hide items to increase sensory tolerance and build hand muscles through sand play. This bin can also be used to build handwriting skills by having your child do some sand writing.

One of the things I learned last year when Andrew attended a handwriting camp was the importance of providing opportunities for children to build handwriting skills in:

  • large ways (ex. writing really big on a white board)
  • medium ways (ex. sand or salt writing)
  • small ways (ex. pencil/paper).

Side note: At Michael’s this morning, I noticed that in addition to regular decorative sand, they had small containers of sand in a variety of colors (in the discount/$1 racks at the front of the store), probably to make those sand in the bottle crafts, but for a few dollars, this sand could be poured onto a rimmed cookie sheet for an easy to assemble writing station. How fun!!

My Obstacle Course Station Activity: Sand Writing

What to include at this station:

  • Play sand in a bin or rimmed tray
  • Towel underneath to catch any stray sand
  • I provide a spray bottle with water so that Andrew can get the sand wet (sand is great to get wet because it makes it easier to write in and dries for future uses!)
  • Pouch with letters for them to choose and write
  • Dice to roll and write
  • Flash cards or cutouts with shapes or words to practice drawing or writing
  • Tools to help: wooden spoon to flip around and use the end like a pencil if your child has sensory issues and doesn’t like the feel of sand on their hands; something with a flat edge to smooth the sand before writing the next letter, number, shape or word

At the station, they practice writing shapes, numbers, letters or words in the sand. This seems and is super simple but it has really allowed me to see if he is forming things like his letters and numbers correctly.

Sand writing utilizes all learning styles (visual, auditory, kinesthetic):

  • the child is seeing what they are drawing or writing (this is done through the letters they choose)
  • hearing what they are drawing or writing (saying it out loud while they are doing it, even adding some dialogue such as, “A square has four sides made of four straight lines. First line – stop. Go down for second line – stop. Go across for the third, bottom line – stop. Go up for the fourth and last line – stop.)
  • actually making the shapes, numbers, letters or words.

Here is a variation of sand writing using salt in a foil pan - Salt Writing. Note: Do not get the salt wet!

Engage, Encourage and Empower!

Different Shades of Blue

In keeping with the summer, beach themed My Obstacle Courses, I’m including a station to use the primary colors to make different shades of blue, like water. This is something that only takes a few minutes to set up but is so fun for children to get to play around with. An activity like this also goes along nicely with building some pretend skills, like pretending to be a scientist experimenting or a magician who is making “magic potions.”

My Obstacle Course Station Activity: Different Shades of Blue

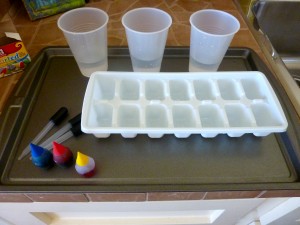
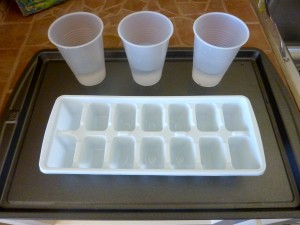
I usually set up a station activity like this near a sink to make it easier to access water for set up and clean up. A rimmed cookie sheet is a perfect “tray” to place below the tools to help catch any stray water or color. I’m all about ease and containing messes :).  I used some clear plastic cups in this particular station but have used ceramic ramekins in past stations and find that those are really helpful if you have children who tend to knock things over, not because they want to, but because they don’t have the hand control. The ramekins are low and heavier than plastic so they don’t tip as easily). I am also using a white ice-cube tray to help the colors stand out even more.

Rimmed cookie sheet, clear plastic cups with water and an ice cube tray.
Additional tools of food coloring (red, yellow and blue - the primary colors) and droppers.

I love including droppers with something like this because it also helps to build fine motor skills! (Click here for a past post on droppers.)

Each cup has a different color and it's own dropper.

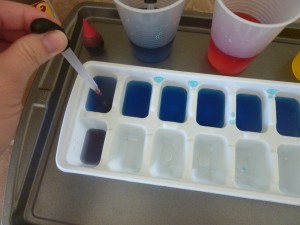
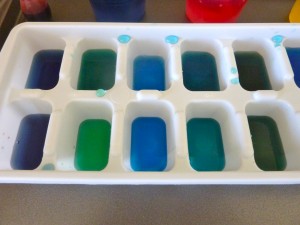
This is where you get to benefit from my experience. I began thinking that I would simply have him use the droppers to fill each section (like shown in the picture below where I had started in the far left corner of the tray) but when I tried it (which I always do before I pass them on to you or try them with him!) it was taking a really long time. I shifted my plan and decided to fill a cup with blue water (also shown below) and fill half of the ice-cube tray with the blue water.

Change in plans!

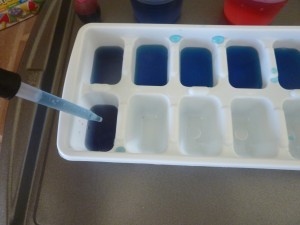
Ahhhhh….much better! Now, I add the colored water to each blue section to make different shades of blue.

Adding red...
...makes purple-ish water.
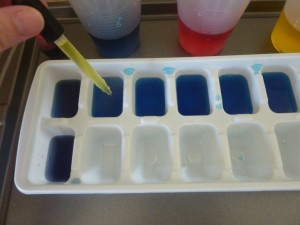
Adding yellow...
...makes greenish water.
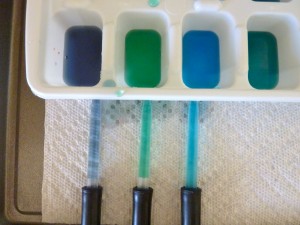
My different shades of blue!
The colored water in the droppers to show the difference.

This was fun for me and is always a huge hit with Andrew! Have fun!!

Engage, Encourage and Empower!

Fourth of July Hat “Search and Find”

Fourth of July hat “Search and Find” is a modification of the “St. Patrick’s Hat Search and Find” I posted on in March. This version uses a July themed hat (think Uncle Sam and parades!) along with some different textured items. I liked this hat because it was deep enough to put items in so the child cannot see what is in there. They have to use their sense of touch and also think about what the items feel like, connecting the feelings with words.

This was something I did with Andrew early on to see if he understood words that described the feeling or texture of something. If he did not, this was a perfect opportunity to teach the word since he could make the direct connection between what he was feeling and the word I was using to describe it.

Fourth of July themed hat.

As I will often do for station activities, I went on a little treasure hunt around my house to see what sorts of things I could find that had unique or different textures. A good place to look is a scrap bin or catch-all box if you do arts and crafts or the crafting aisles at Michael’s. Pictured below are some of the items that I gathered up for our My Obstacle Course.

Some different textured items for this activity.

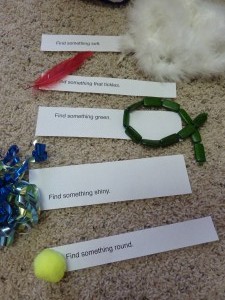
I typed up and printed out some basic instructions each beginning with “Find something” to help build literacy skills. These could be printed out on pieces of paper or index cards but I like how quick it is to just print and cut them into strips. Do whatever is easiest for you!

Clues!

My Obstacle Course Station Activity: Uncle Sam Hat “Search and Find”

Station all set up and ready to go!

I like to turn the strips of paper over to make it more of a game and allow him to choose.

First thing to find is something round.
Reaching into the hat, but no peeking!!

Keep in mind that if your child needs to look to find it, that is okay! This is a fabulous opportunity to help them build their knowledge of specific, descriptive vocabulary right along with something real that they can touch.

A colored puff is round (when I'm not squishing it 🙂 )!
Something shiny - a ribbon bow for a gift.
Items matched with descriptions for one "Search and Find" station.
Items matched with descriptions for another "Search and Find" station

We began basic with very different kinds of textures and progressed to being even more specific in choosing the best item to fit a description. This basic activity can be adapted in so many different ways – I love things like this!!

Engage, Encourage and Empower!

Sensory Sand Bin

I’ve done previous posts on using sensory bins with dried beans and fake snow and think that a perfect summer sensory bin is a sand bin. This is something that I would do in a low, wide plastic bin with a lid, so it can be stored away while not in use. I would also place it on a beach towel to contain the sand.

This may be something that your child already does all of the time but in the past it is not something that has been a preferred activity for Andrew. There are so many motor skills to work on, such as scooping, pouring, raking and sifting.

My Obstacle Course Station Activity: Sensory Sand Bin

Hide some sand safe objects in the sand and the child uses their hands, fingers or tools to dig and find the objects. You can include a sheet of paper with a list of the hidden objects to help give purpose while also building literacy/vocabulary skills. Other objects that could be hidden are letters, numbers, blocks, cars, little toy animals or items that could be sorted by color or shape.

Sand Bin
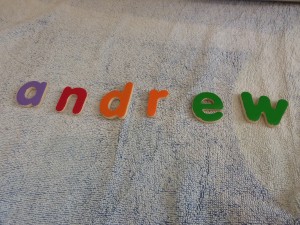
Wooden letters spelling out his name
Digging in the sand to find letters.
Using the sand sifter and finding the letter "n"!

This type of activity is another example of the importance of reintroducing something that a child may not have been into before. I have done sand bins with Andrew before and as I said above, he was not into it. Knowing how this goes but also wanting to give him another shot at experiencing this, I make sure that the station activities are easy to set up and keep my expectations in check, not planning on him spending hours playing in the sand as I did as a child.

Fingers and hands in the sand!
Look at that! One hand in the sand, the other one grasping the shovel.
Hooray! An "M" was found!!

I included the sand bin in our last My Obstacle Course and he was totally into it! I hid some letters that spelled out the word “summer” and he worked with his hands and with some tools that I provided to dig out the letters. He was so excited as he found each letter. I even found him smoothing the sand with his hands and squeezing his sand filled hand, allowing the sand to sift through his fingers. His hand muscles are clearly getting stronger, as I noticed him able to grasp and actually dig down into the sand. This is huge for us!!

I look forward to providing more of these opportunities for him while also making sure to give it a purpose (spelling words, finding hidden objects, etc.) until he decides he is ready to just “play in the sand” (if and when this will happen).

Engage, Encourage and Empower!


Water Wheel Pouring Station

My Obstacle Course Station Activity: Water Wheel Pouring Station

Here is a great toy to help work on pouring skills. Andrew is still very tentative about pouring and hasn’t quite gotten the slowing down when the cup is almost full concept yet. Because of this, I tend to be very involved when he is pouring things like juice but I want him to get more opportunities to practice this skill without me being so nervous about spills. I am going to use this toy because it is super motivating for him since the wheels spin as the water goes through. I am also going to work on helping him notice how fast the wheels are spinning.

Let’s make the wheels spin fast! (Pouring quickly)

Let’s slow the wheels down! (Pouring slowly, almost dribbling it in)

My Obstacle Course Station Activity: Water Wheel Pouring Station
Water Wheel

I would strongly recommend doing this station right at a sink, pulling a chair or stool up so the child can reach. This will help with filling the cup as well as working on pouring into the funnel without worrying about getting water all over the place.

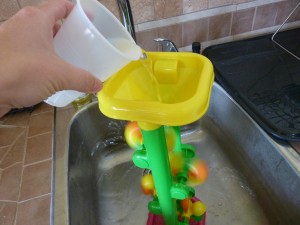
Cup filled and ready.
Pouring water into the funnel.

While Andrew loves to be wet in the swimming pool, bath or shower, he does not like to be wet when wearing regular clothes. This being the case, I would provide him with towels to dry off right away or have an extra shirt on hand for him to change into right away. (I have to say that I personally don’t enjoy having wet shirt sleeves either so I totally get it.)

Water alternative: Pouring dry sand (or salt) would work as well when used in a sand bin or on a rimmed cookie sheet to catch it. I would also suggest placing a towel underneath (perhaps a beach towel to go with the theme) to help contain it to the station area.

Engage, Encourage and Empower!
 

Next Page »

Primary Sidebar

Obstacle Course Mom’s Blog

  • When People Stare, Mind Your Own Business
  • ABC’s of Peaceful Parenting Tele-class
  • What’s Perfect About This?
  • Exciting News!
  • Halloween

Categories

  • Blog
  • Cool Tool
  • Fine Motor
  • Getting Started
  • Gross Motor
  • Literacy
  • Math
  • My Obstacle Course Station Ideas
  • Oral Motor
  • Problem Solving
  • Sensory
  • Social Skills
  • Uncategorized

Archives

  • July 2012 (1)
  • May 2012 (1)
  • January 2012 (1)
  • November 2011 (2)
  • October 2011 (12)
  • September 2011 (14)
  • August 2011 (15)
  • July 2011 (19)
  • June 2011 (18)
  • May 2011 (21)
  • April 2011 (20)
  • March 2011 (22)
  • February 2011 (19)
  • January 2011 (21)
  • December 2010 (22)
  • November 2010 (6)

Meta

  • Log in
  • Entries feed
  • Comments feed
  • WordPress.org