• Skip to primary navigation
  • Skip to main content
  • Skip to primary sidebar

My Obstacle Course: Engage, Encourage and Empower

A fun, structured, systematic way to work on your child's strengths and weaknesses at home!

  • Welcome to My Obstacle Course!
  • What is My Obstacle Course?
  • Developmental Timelines
    • What Is My Child Ready For?
  • About Us
  • Blog
  • Contact Information

Gross Motor

Valentine Themed Ball

Sparkly Valentine Ball (that also happens to light up when bounced!!)

This particular ball holds a special place in my heart and while I know that sounds corny, it actually does. I found this ball last year and purchased it because it was sparkly and went along with the February theme since it had a heart inside.  At the time, we were really working with Andrew on his bouncing skills. We tried all sorts of things but he just really didn’t care about bouncing a ball. He used to barely look at the ball when tossing or catching with me. (*See note below) Of course, I didn’t give up on this and knew that eventually I would find something that would let me know either that he was not able developmentally to bounce and catch a ball yet or he could do it and just didn’t see the purpose in doing so.

While setting up one of My Obstacle Courses, I took the ball and bounced it to see how it worked because it was a bit heavier than the other plastic balls we’d used so I wanted to experience what he would experience with it. I bounced it and the heart flashed! I was beyond happy because Andrew is a huge fan of lights, always has been and probably always will be.

Finding The Right Motivation

I kept this light up heart a secret and when he showed very little enthusiasm for bouncing the ball I told him that if he did it he would be surprised, but that he had to bounce it.  I showed him how he needed to do this because I had to bounce it pretty hard to get the heart to light up.  He saw this and his eyes opened wide and right then and there he bounced the ball AND caught it multiple times in order to get the heart to flash.

His bounces and catches were not perfect but I was not going for perfection.  I wanted to see if he was able to push down for the bounce, use his hands together to catch all while tracking the ball down and up with his eyes – so much to do for something that comes easily to so many! Even if he hadn’t been able to do it, I had found something that would have motivated him to at least try.  He wanted to see the light flashing and would do whatever it took to get it to happen, even if mom had to help out!!

Note: I attended a brain conference which gave me some insight into why children don’t look or focus on things like this and it has to do with convergence of vision, which can produce the appearance of multiple or blurred objects. I think this was part of his issue since I don’t think he would have chosen to have balls thrown into him. I realize how frustrating it must be to not be able to really focus on something and we worked to provide ways to help him.  This got better as he did more cross patterning activities like crawling, running, swimming and monkey bars, all of which helped his brain develop. When choosing this as a station activity, I knew that he was close to being able to bounce and catch and having knowledge about this, had he not been there, I would have chosen to do something like rolling it back and forth.

Engage, Encourage and Empower!

Make Your Own Tunnel

Andrew began getting OT (occupational therapy) services this year and it has made such a big difference for him.  I would sit in the waiting room and listen to the laughter coming from the kids and the therapists – what a fun job!!  One day they had me come back and Andrew was creeping and crawling through this stretchy tunnel and when he would get to the end he would come out with this huge smile on his face.  I love anything that gets him creeping and crawling and when I saw that smile, I knew I had to have one of those at home!

Professionally Made Sensory Tunnels Cost What?!?!?!?!

I did what most parents like me do when they see smiles like that, I got on my computer and searched to see if I could find one.  I found some sold at stores specializing in sensory tools and toys but was shocked to see how much they cost!  So, the next time I brought him to OT, I looked closely at the tunnels that they had, saw how basic they were and knew I could make one at home on my sewing machine.

I went to the fabric store, bought 3 or 4 yards of some stretchy, jersey-like fabric that was on the clearance table (didn’t matter to me the pattern or color) and some heavy duty thread.

Perfectly Imperfect

I am not a perfectionist by any means so when I got home and began to work, I decided to use clothespins instead of pinning the entire piece (If you are a perfectionist and need to pin it carefully, by all means go for it!  I just know that I don’t have the time or patience and realized that it wasn’t going to matter to either of us if the hem was a little crooked.).  The tunnel is not perfect but it works perfectly!!

Close up of the stretchy fabric with clothespins holding the two long ends together.
Pinned and ready to sew!!
My sensory tunnel with clothespins showing open ends on each side so the child can crawl through.
Sewing the hem for my sensory tunnel.

I sewed a hem about 2 inches in to create a  long tube.  I did go back and sew over my hem to make sure it would hold tight.  Once that was done, I turned it inside out so that the hem was on the inside.

I then gave it to Andrew to try out and…

Getting ready to creep and crawl through.
Andrew getting in and modeling the stretchiness of the tunnel.

he LOVED it!!  His very own tunnel at home.

A HUGE success!! Look at that smile 🙂 ! Â (Sorry for the blurriness but he just moves so fast!)

I have plans to make another one a little bit tighter to provide even more sensory input as he is crawling through.  The one we have now has enough room for him to do somersaults in – huge bonus for him!!  We have also used this like those stretchy body socks, positioning it so he is standing on it with enough tunnel to sit on top of his head while his arms can push against the sides.

Energetic Children Part 2

The My Obstacle Course station ideas I gave yesterday included toys and tools that we have accumulated through the years as holiday and birthday gifts as well as some things that we purchased for him to work on his motor skills. Today I will focus more on things that I have around my house and are fairly common things in the houses of young children.

Go On A Treasure Hunt In Your Own Home And You Might Be Surprised At What You Can Use!!

I encourage you to be creative, go out to the garage or climb deep into the depths of the closets throughout your house and you just might be surprised at what you find that could be incorporated into a fun My Obstacle Course for your child.  I found collapsible tunnels (which I’ve posted about), an unused nap mat, a bean bag toss game, balls that weren’t played with and even had an idea while climbing the stairs during my hunt!

Nap mat

Nap mat turned into surface for rolling

I got the idea to include this regular nap mat after a gymnastics session. I realized that while he certainly didn’t use it for napping purposes, it would be a fabulous My Obstacle Course station. It could be used as a place to work on hot dog rolls, forward or backward rolls. I have also put it against a wall so he could do a supported head stand, handstand or wheel-barrow walk up (walking feet up the wall while hands are on the mat and arms are straight).  If you don’t have one of these, get creative- think folded blankets, patio furniture cushions.

Use the Stairs

Using the stairs for a "Climb and Match" activity.
Climbing!
Matching! Now back down the stairs for the next one to match.
  • “Climb and Sort” or “Climb and Match”-The stairs are great for matching or sorting activities because you can place the items or cards to be sorted at the bottom and the containers to be sorted into can be at the top. Since he can only take one item or card up at a time, this has been a good energy buster for us!
  • If you want something with no preparation required, set a timer and see how many times they can climb up and down (one foot on each step if they can) before the timer runs out.

Balls

A ball for tossing or kicking while spelling or counting.

Lightly pass or kick a ball back and forth as you say the ABC’s, spell spelling words, count forwards or backwards. You can say them together or take turns so that everyone has to pay close attention!

Bean Bag or Rolled Sock Toss

Empty bin and some of my rolled up socks
Tossing the rolled up socks into the bin!

Place a container (box, bin or pail) a few feet away from where your child will be standing. Have them toss the bean bags or rolled socks (hey, you don’t have to go out and buy things to work on these skills 🙂 !) into the container. This works on motor planning and the motor skill of tossing in the same motion that one would use while bowling.

Engage, encourage and empower your child at home and have a bit of fun with them while you’re at it!!

Energetic Children?

The next two posts are specifically for all of you out there with children who are really active and need to be moving around (like my child!).  One of the things about My Obstacle Course that has made such a huge difference for us is the fact that the activity stations are not long, drawn out, “sit here for an hour” things.  They are quick, to the point and then move on, which is why the activities I show you are also quick and easy to make!

Holy Cow!  Where Is All Of This Energy Coming From And Where Can I Get Some?

Andrew is very active and is known to run in place kicking his bottom (which probably also explains why he’s all muscle and no fat – must try this myself!) so when I would try to get him to sit and work with me at the counter or table  – miserable failure!  By using the obstacle course structure with numbered stations set around the room, we were literally moving from thing to thing but in a structured and systematic way.  Since it was an adventure, engaging with me became much more appealing, especially since there was very little if any that required him to sit on a chair.  There were stations I set up around the kitchen table and actually removed the chairs so he could focus on the activity and not on falling off of or squirming around the seat.  Having been a teacher, I know there is a time and place for working on this skill, but my main goal as his mom was to find a way to engage with him.

School’s Out!  Now What?!?!?!?!?

I’m writing this now because for the next few weeks these active children will be at home with us and instead of fighting the energy, I encourage you to set up your own Obstacle Course and use some of these activities to put that energy to use in a strategic and purposeful way.  If you have an active child, you probably already have toys that can be incorporated into stations that can help burn some energy while also building academic skills.  Here are some things I have used in My Obstacle Courses and how have I have used them.

Mini-trampoline

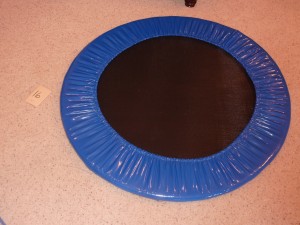
Mini-Trampoline

The mini-trampoline has been quite a life-saver for us.  It allows Andrew to be bouncing and getting sensory feedback while keeping his body in one location.  I began including it as My Obstacle Course stations to work on his counting by counting as he jumped.  We have counted by ones, fives and tens.  The next thing we will try is counting by twos!

We also use the mini-trampoline to help work on all of the motor planning involved with jumping jacks.  Getting the feet out and hands up together and then hands by his side with feet together has been quite a challenge but it’s a fascinating process to watch because it is clearly a brain planning issue.  This is something I do with him so he gets the visual cues for imitation.  When we begin this activity, we only do one half of the body (top or bottom) at a time.  We jump together, focused only on moving feet out and in.  Then we only do our arms – down by our sides and then up over our heads.  After practicing those motions, both parts are put together and if he is not successful, no worries, we just try again another day!

Sit and Spin

Sit and Spin (ours is the kind that does not have any lights or sounds- specifically because that's what he "stims" on)
My Obstacle Course Station Idea: Spin and Count

I have said this before and will say it again, spinning is Andrew’s thing!  Just look at his face in the picture above, anything to do with spinning brings him joy and is obviously something that his body needs.  When searching around for things to include in My Obstacle Course, I saw the sit and spin in our closet and thought that this toy would be a great way to combine spinning with counting and following directions.  Sometimes we count by ones and he has to spin one direction a certain number of times and the other way a certain number of times.  Other times we count by fives or tens to a given number and then we count backwards when going the other direction.

Balance Board

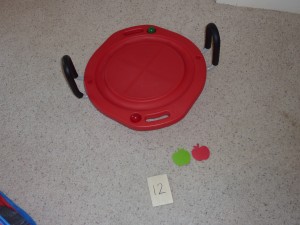
Balance Board with handles - this one has a ridge so that balls can roll as you balance
My Obstacle Course Station Idea: Balance and roll a ball a given number of times.

We got this as a gift one year but didn’t use it very much.  I decided to use it as a station activity to build not only his balance but also motor planning because he had to balance and move so that the ball would go around the ridge a certain number of times.  It became much more fun once it had a purpose and he has since become quite skilled at getting the ball to go around quickly while not having it fly out of the track!

Carpet runner

Carpet runner used for "Crawl and Match"
My Obstacle Course Station Idea: Crawl and Match

In my post about tunnels I wrote about my desire to increase the crawling Andrew was doing.  Getting both sides of his body moving together meant getting both sides of his brain working together, creating connections.  I scatter the collapsible tunnels I have throughout My Obstacle Courses but also wanted a way to get more continual crawling.

I found this remnant carpet runner at Lowes and thought it would make a great location for crawling.  Now, Andrew isn’t just going to crawl because I have a fancy carpet runner on the floor.  Like most things with him (and he’s not unlike most people I know), he needed to see the purpose in doing this.  Explaining to him that crawling would help his brain make connections wasn’t going to do anything and I knew I needed something clever.

I decided to incorporate a sorting or matching activity with the carpet runner, calling it “Crawl and Match” or “Crawl and Sort” and he would start at one end, grab an item or card to sort or match after crawling down to the other end.  It was something that we both had to do at first and at times I would crawl almost on top of him but it worked and he was very excited about seeing what sort of thing he would be doing – matching up word parts, sorting addition equations by their sum, sorting words into rhyming families, etc.  If you have little ones, it could be as easy as sorting items by shape, color or function.

See, even I have forgotten that I am supposed to be writing about crawling on the carpet runner instead of the activities that are part of the station (I will definitely do a post soon on all of the variations I have come up with for these two games!).  Funny how your mind focuses on things it finds interesting and fun – guess the apple didn’t fall too far from the tree here in this house!!  The same thing happens with Andrew and while he’s focused on what he likes (words, clues, numbers) the crawling just becomes part of the activity at this station.

Engage, Encourage and Empower!

Ball Play a Problem? Try Something Sparkly!

My son is one of those children that doesn’t like to play ball- throwing, tossing, catching or kicking – doesn’t matter, because right now* he could care less. (*Note:  I say “right now” because there have been things in the past that he didn’t care about (ex. handwriting) but now he does (because he’s obsessed with names and wants to write them 🙂 ) so don’t dismiss things that your child is not into because they may just not be ready for it.  If at first they aren’t into it, try and introduce it again later! )

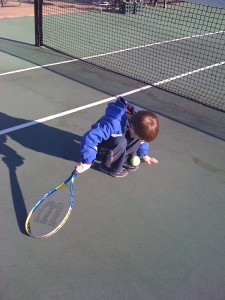
What playing ball sports usually looks like in our family- I am attempting to teach him about tennis (surprisingly at his request, although the whole experience lasted about 3 minutes). If you look closely, he has placed the ball upon his shoe and is quite proud of himself!

There are those of you out there who probably cannot believe this, thinking about your own child who would go to “ball” school if they had one.  However, while I once felt all alone, I have met many other parents who have children similar to Andrew.  These children tend to find this an activity that is quite difficult for them, they do not see the purpose in it, and aren’t into playing team games, especially when you add unpredictable kids, loud whistles, yelling and of course all of the rules to remember so the loud whistles and yelling don’t occur.

What I had never really thought about before was all that goes into something as basic as passing a ball-

  • one has to be able to see the ball
  • one has to be able to visually track the ball
  • one has to be able to plan and coordinate lots of muscles in order to throw or catch the ball


For a while I didn’t know if he could do it or not because he wouldn’t look at me or the ball when I would throw it to him.  This resulted in many “mother of the year” moments, bopping him in the chest with a ball  (Now, I wasn’t the only one to do that, the neuropsychologist evaluating him did the same thing!).  While I have no aspirations for him to play professional sports, we do work on ball skills with him to build his visual perception and tracking and motor planning skills.

When the same old, same old doesn’t cut it, try something sparkly to catch their attention!

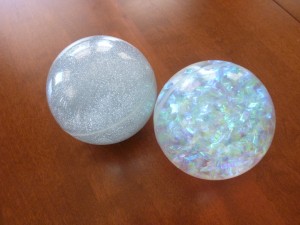
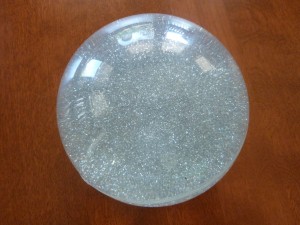
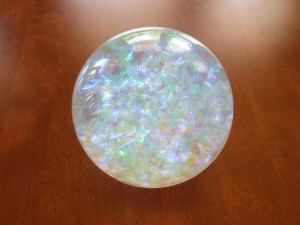
I found these two balls at Michael’s Arts and Crafts store and thought they would be the perfect addition to a winter themed Obstacle Course. They were also sparkly enough to catch his attention!

My Obstacle Course station idea: "Snowball" tossing

One was filled with some sort of liquid and glitter.  When I saw this sparkly ball it reminded me of a wintery night with the falling snow lit up by the streetlights.

Snowy night ball

The other one was the same size but reminded me more of a large snowflake inside.

Snowflake ball

When he first saw the ball, he was fascinated in the same way that a snow globe fascinates him.

A regular ball becomes a very cold snowball when used in a winter themed Obstacle Course!

In order to build his pretend play skills, I told him that we were going to pretend that they were snowballs and they were VERY cold so we had to pass them back and forth before our hands got too cold.  We tried it, starting close together at first while passing it back and forth.  Eventually we took some steps back and he would actually look at the ball while I had it and would watch it while I tossed it back to him so he could see what was happening inside the ball.  He was engaged because he got to see something he found interesting and I was empowered because I got to see where he was with his ball skills!

Tunnels

One of the great things about My Obstacle Courses is that multiple areas of development are mixed and matched giving me more bang for my buck, especially when needing to build skills that my son wasn’t crazy about practicing.  I had learned about the importance of crawling for brain development (cross-patterning, using both sides of your body at the same time (ex. right arm with left leg, left arm with right leg when you walk and run), helps make brain connections and the distance from the floor to your eyes is around the same distance you read things at- fascinating stuff- more to come!) and wanted a way to get him crawling more.  Just as most things are with him when it comes to something I want him to do, he wasn’t crazy about just getting on the ground and crawling with me.  I figured that if I could just make it part of the obstacle course, he would do it.

Hidden Treasure

One day as I was scouring my house trying to find things to use, I found some collapsable tunnels that he had gotten as a gift one year.  Those tunnels and tents would make perfect stations, not only making it more visually appealing for him but it also made it more of an adventure to have to go through them on the way to the next station, not always knowing what was going to be waiting for him on the other side.  It worked!  Sure enough, he began crawling, as long as it was part of the Obstacle Course.

"What do I get to do next?"
My Obstacle Course station idea: Â square collapsable tunnelÂ
My Obstacle Course station idea: small round tunnel
My Obstacle Course station idea: Tent-like collapsable tunnel is used to "hide" parts of an activity. Â

What a great, easy way to add a bit of fun and adventure to My Obstacle Course!  Since they fold up flat, when you are done, just stow them away for the next time.

« Previous Page

Primary Sidebar

Obstacle Course Mom’s Blog

  • When People Stare, Mind Your Own Business
  • ABC’s of Peaceful Parenting Tele-class
  • What’s Perfect About This?
  • Exciting News!
  • Halloween

Categories

  • Blog
  • Cool Tool
  • Fine Motor
  • Getting Started
  • Gross Motor
  • Literacy
  • Math
  • My Obstacle Course Station Ideas
  • Oral Motor
  • Problem Solving
  • Sensory
  • Social Skills
  • Uncategorized

Archives

  • July 2012 (1)
  • May 2012 (1)
  • January 2012 (1)
  • November 2011 (2)
  • October 2011 (12)
  • September 2011 (14)
  • August 2011 (15)
  • July 2011 (19)
  • June 2011 (18)
  • May 2011 (21)
  • April 2011 (20)
  • March 2011 (22)
  • February 2011 (19)
  • January 2011 (21)
  • December 2010 (22)
  • November 2010 (6)

Meta

  • Log in
  • Entries feed
  • Comments feed
  • WordPress.org