• Skip to primary navigation
  • Skip to main content
  • Skip to primary sidebar

My Obstacle Course: Engage, Encourage and Empower

A fun, structured, systematic way to work on your child's strengths and weaknesses at home!

  • Welcome to My Obstacle Course!
  • What is My Obstacle Course?
  • Developmental Timelines
    • What Is My Child Ready For?
  • About Us
  • Blog
  • Contact Information

Cool Tool

Party Tray Sorting: Buttons and Coins

I shared a few weeks ago about these fun, colorful plastic party trays that I found that can be also used for sorting items. (Here is the link to Party Tray Sorters.) Here are two more ways to use them with things that you probably have lying around the house. Using a party tray like this makes it super simple to set up, easy to have the items contained while also providing a good space to sort into.

My Obstacle Course Station Activity: Sorting Buttons By Color

I have a huge bag of buttons that I have accumulated over the years but also found these great little containers of different colored buttons at Michael’s. (Here is a previous post on Button Sorting using a winter theme.)

Party tray + buttons = Easy sorting station
My Obstacle Course Station Activity: Sort the buttons by color
Sorting buttons by color.

My Obstacle Course Station Activity: Sorting Coins

My Obstacle Course Station Activity: Coin Sorting
Coins sorted.
Andrew sorting coins.

We did this particular station activity during our last My Obstacle Course. It was great to see him able to identify the coins but also learn the difference between nickels and quarters by placing close attention to the details on the coin. I got to point out the different presidents and also remind him that Monticello is on the nickel and is a place that he has visited when we lived in Virginia.

He sorted them systematically, sifting through them to find the specific coin he was working on. He was also talking to himself, reading the words on the coins as he was sorting, saying things like, “Liberty” and “In God We Trust.” It was very sweet to listen to! 🙂

Engage, Encourage and Empower!


Find It! Toy

I was doing a “treasure hunt” around my house to see what we have to include in a summer themed My Obstacle Course. I went into Andrew’s closet to look for some summer books and my eyes fell upon the shelf where this “Find It” toy he had received from his grandma was sitting. This is a great item for car trips or lazy summer afternoons but it also makes a great, super easy (no set up required at all!) station activity.

“Find It” is a cylinder filled with colored rice sized beads that hide thematic items (kind of like a sensory bin without being able to touch). There are several different varieties that I have seen for sale in toy stores (Brilliant Sky is one I know for sure that carries them).

toy

Twist and turn the toy to expose different items, trying to find items that are listed at the top.

Item list

I really like this toy because it includes items that are quite common as well as some items that are not as familiar, giving us an opportunity to build vocabulary.

Sand dollar up close.

We don’t have a lot of “sand dollars” where we live so when he comes across it and wonders what it is, I can help give it a name while pointing out some unique characteristics.

I like that the items are not too simple. I always say that intelligibility and intelligence are not the same thing and it is nice to have something for him to play with that doesn’t insult his intelligence.

Close up of some items

When using this as a station in My Obstacle Course, I will have him either find 10 items or have him choose from the list which 10 items he will be hunting for. From there, I may have him practice writing a few of those words (maybe 3 or 4) at the next station to work on his handwriting skills. This could be done with Magnadoodle, Aquadoodle, pencil/marker/crayon and paper, dry erase markers and white board, or chalk on a chalkboard.

Note: While I haven’t done this myself, I am going to try to make my own using a tennis ball container (label removed), dried rice and some small items from Michael’s. I tried this around Christmas time with fake snow and it didn’t work very well so I’m thinking that rice or something like it might move better. I would love to know if anyone has done this already! Definitely thinking some duct tape around the cover once it’s been completed so little hands don’t open it up all over the living room! 🙂

Engage, Encourage and Empower!

Sand Pail Sorters

I love utilizing sorting stations in My Obstacle Courses. It allows children to demonstrate their knowledge and understanding without needing to have words. There are so many different sorting options depending on the things and concepts that you want to build or reinforce with your child. I have found that by changing up what the child is sorting into, it helps to keep it fun and fresh.

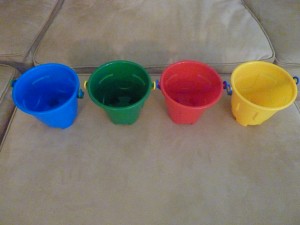
I found these colorful pails at Michael’s and while they are meant for playing in the water and sand, they are also perfect for a sorting station. So colorful and they stack nicely for storage purposes.

Colorful Sand Pails from Michael's

Besides an obvious sorting station of sorting by items by color, here are some other sorting ideas:

My Obstacle Course Station Activity: Sort the boys and girls (These were from Fisher Price toys in our closet.)
My Obstacle Course Station Activity: Sort by function - Things that fly vs. Things that drive
My Obstacle Course Station Activity: Sort the sea animals (These were pattern cards I had gotten at our teacher store. I have used these for counting, patterning, graphing and sorting.)
My Obstacle Course Station Activity: Sort by word family

I encourage you to think about what skills or concepts your child is ready to work on and make it a bit more fun by turning it into a sorting station. This is something I include in all of our own My Obstacle Courses because it really is a quick and easy way to see where your child is in the area you are working on. None of these examples took more than 10 minutes to put together, just a matter of deciding what to work on and getting a little creative by looking around at what you already have.

Engage, Encourage and Empower!


Pretend Play – Theme Boxes

When I first set out to really work with Andrew, one of the things that I wanted to focus on was his pretend play skills. I thought about what preschools and kindergartens did to encourage children to pretend play and realized that they simply provide materials for children to experiment with and play with usually based on a given theme for the week.

I remember our school receiving several kits while I taught kindergarten and my students loved going to the stations that had those kits. There was one in particular that was a paleontologist kit which had a little sand bin with fossils, bones and eggs that you could bury and unearth using toothbrushes, paintbrushes. The children would put on safari type hats, khaki vests and for that short time, they were paleontologists! There were some children who preferred to just play with the dinosaur figures and that was okay. I knew that it would not be that easy or natural for Andrew but thought that there had to be some way to introduce and expose him to this sort of fun thing using a more strategic manner.

It happened to be right around his birthday when I was thinking about this so when family members asked what he wanted, I told them that instead of going out and buying another toy he wasn’t going to play with, I asked them to choose a theme, get creative by getting things that reinforced that theme so we could make pretend play more meaningful while making connections. This did not have to cost a lot of money and could not include anything that had an on/off switch. We got so many fabulous things ranging from books to costumes and everyone had so much fun knowing that they were doing something that would help him.

The themes I chose were: cook, firefighter, farm, space, dinosaurs, doctor, construction, grocery store, cars.


Chef Andrew cooking up some Chex cereal concoction. He was only willing to lick, not eat what we made but that was farther than we had ever gotten with something like that!


It was so great and I still have those boxes, adding books or toy figures to them if they go along with the theme.

In my mind, working on building pretend play skills has to begin with relating it to one’s own life. This is a bit more challenging when a child is only focused on themselves but having theme boxes at home is a great way to slowly build this awareness in a safe environment.

When introducing this with Andrew in My Obstacle Courses, I began by choosing a theme, looked at the contents of the box and picked one thing to introduce. This was as simple as matching up the big dinosaur with the little dinosaur, putting a tool on it’s name card, or pointing to the ladder on a fire truck. This may seem basic, and if it is for your child, make it more in line with what they can do, but I was starting where he was, building the foundation. I would start this way because it is not as intimidating as sitting there with a bunch of stuff that they don’t relate to, cannot name and don’t know the purpose of. They cannot know what they do not know (just like us, huh!) and some children need this kind of play introduced more strategically.

From there we progressed to concepts like animals learning how to make friends using social scripts. A hammer used to tap a nail (or a golf tee) into a piece of thick foam. Dried beans, rice and pasta can be poured into a large bowl and stirred to make a colorful “salad” or “soup.”

Scripting Play

I strongly encourage using scripts if your child struggles with “getting” pretend play. It made all the difference in the world for us. It removed lots of unnecessary words from my mouth before the play actually began, which can often overwhelm and confuse him. It made it official, after all, it was printed out on a sheet of paper! It also provided a logical sequence of activity.

Ex. Push the blue car up the ramp. Park the blue car in a parking space. Put the red car in the elevator. Make the elevator go down. The red car needs gas. The red car is ready to go!

That’s it! Nothing fancy required but it made a huge difference. This gave Andrew a schema for what to do with these items, how to use them and what all of the parts of the garage could do. I did add some pretend play talk and noises while he was moving the cars around to model this for him.

While it did not happen overnight, just last night we got to listen to him pretend play with a castle and some people. The queen had gotten “hurt” and he walked two knights over to get her, making them walk across the floor while saying, “Oh no, she’s hurt!” They got her and brought her back to the castle. Some of you may think this is not a big deal and others may feel like they’ll never get there (I was like you!) but I feel that any small step one can take to move toward a goal is a step worth trying and taking.

Engage, Encourage and Empower!


Party Tray Sorters

I found these bright, colorful, plastic party trays last year (I think at Michael’s but I cannot remember for sure 🙁 ). You can pair one of these trays with items like colored puffs, thematic felt stickers, goldfish crackers, buttons, beads, or anything that can be sorted by a specific characteristic (color, size, etc.) and you have an easy My Obstacle Course station activity.

Here are some ways I’d use them:

My Obstacle Course station activity: Sort puffs by color.
My Obstacle Course station activity: Sort puffs by size.
My Obstacle Course station activity: Sort by sport. (These are felt stickers I found at Michael's.)
My Obstacle Course station activity: Sort Goldfish crackers by flavor.
My Obstacle Course station activity: Sort the magnets by color.

Obviously, you do not need these particular party trays. I am just showing how to use something that was colorful and inexpensive to create a fun, easy activity to build sorting skills.

Engage, Encourage and Empower!


« Previous Page

Primary Sidebar

Obstacle Course Mom’s Blog

  • When People Stare, Mind Your Own Business
  • ABC’s of Peaceful Parenting Tele-class
  • What’s Perfect About This?
  • Exciting News!
  • Halloween

Categories

  • Blog
  • Cool Tool
  • Fine Motor
  • Getting Started
  • Gross Motor
  • Literacy
  • Math
  • My Obstacle Course Station Ideas
  • Oral Motor
  • Problem Solving
  • Sensory
  • Social Skills
  • Uncategorized

Archives

  • July 2012 (1)
  • May 2012 (1)
  • January 2012 (1)
  • November 2011 (2)
  • October 2011 (12)
  • September 2011 (14)
  • August 2011 (15)
  • July 2011 (19)
  • June 2011 (18)
  • May 2011 (21)
  • April 2011 (20)
  • March 2011 (22)
  • February 2011 (19)
  • January 2011 (21)
  • December 2010 (22)
  • November 2010 (6)

Meta

  • Log in
  • Entries feed
  • Comments feed
  • WordPress.org