• Skip to primary navigation
  • Skip to main content
  • Skip to primary sidebar

My Obstacle Course: Engage, Encourage and Empower

A fun, structured, systematic way to work on your child's strengths and weaknesses at home!

  • Welcome to My Obstacle Course!
  • What is My Obstacle Course?
  • Developmental Timelines
    • What Is My Child Ready For?
  • About Us
  • Blog
  • Contact Information

Blog

Halloween Sticker Patterns

This is a super simple way to build patterning skills along with fine motor skills – Halloween themed patterning!

I had some packages of Halloween themed stickers (could be any theme at any time of the year though) and got out some orange index cards. I began a pattern using the stickers (shown in the photo) and when Andrew got to the station, he looked at the pattern, found the sticker that went next, peeled it and worked to stick it on the card.

Halloween sticker patterns

Seems easy enough, right? This was actually a really challenging activity for him, not necessarily figuring out the patterns, but all of the motor planning involved in removing the sticker, having the sticker on his fingers and then working to place the sticker carefully onto the card in the spot next to the previous sticker.

This is an example of using a strength along with a weakness to provide motivation. While he would make comments about the stickers being sticky and tricky, as he was doing this he was really focused on the pattern. If you have a child who struggles with patterns but loves stickers, this is a great way to help build patterning while using a material that they enjoy.

As you can see from the photo, this is very basic activity yet it provided a fun, thematic way to build all of these skills!

Engage, Encourage and Empower!

Halloween Ring Sort and Count

This is one of my favorite station activities because it was one of those moments where I realized that I could take an item, alter it a bit from it’s original intended use and create activities with it to build skills and find out what Andrew knew.

I purchased a package of Halloween rings (either from Target or Michael’s, cannot remember) and used my scissors to cut off the ring part. (I don’t know about you but those rings were never very comfortable and I knew that Andrew would never wear them.) This left me with black and purple bats, black and orange spiders, and skulls (or skeletons).

I decided that I would have him sort these pieces and then count them. I got out the colorful Easter egg dying cups for him to sort into and wrote a label for each one so that he would see the words that went along with the item (color and object). I strategically chose a certain amount of each one and placed those in a container ready for him to sort.

Station set up and ready to go.

Once at the station, he sorted the items.

Andrew sorting.
Andrew talking about what it is and where it should go.

When he was done sorting, I had him count how many of each. We used some dice to represent the number of items in the cup. We then decided which group had the most, the least and checked to see if any were the same or equal.

Close up of labels, rings sorted and dice representing number of rings in the cup.

This was a favorite station for him and it has been modified throughout the years to work on addition, subtraction, patterning. This year it will be used to build multiplication and division skills (which is simply making “equal groups of”).

Engage, Encourage and Empower!

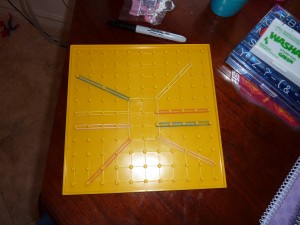
Geoboard Spider

Using a geoboard to create a spider is a great way to sneak in some fine motor and motor planning skills during an October/Halloween themed My Obstacle Course.

My geoboard spider (I always try out activities beforehand in case they don't work.).

This is a super easy station to set up, all you need is a geoboard and some rubber bands (which the geo board comes with). Click here for the Geoboard Google Search results as well as a picture of a geoboard with rubber bands creating what looks to me like a spider web – another way to use it with this theme!!

I began the rubber band spider with a rectangle body and Andrew’s job was to create the 8 legs, 4 on each side. This requires using both hands together with one hand either holding the peg with one end of the rubber band around it or holding the board so it doesn’t move and some hand strength with the other hand to be able to pull the rubber band to stretch it all the way over the peg.

Andrew working to make his geoboard spider. See how he has to use two hands together to stretch the rubber bands?

Children generally enjoy working with geoboards because they rarely get to “play” with rubber bands. Ever watch an adult with a rubber band? There’s just something about them that keeps fingers and hands busy while stretching and twisting them – so fun!

Engage, Encourage and Empower!

Jack-O-Lantern Ball

A jack-o-lantern ball like this one is a super fun addition to an October/Halloween themed My Obstacle Course! I saw one of these the other day at the grocery store and I think I got mine at Target.

Jack O Lantern Ball

Use for:

  • bouncing
  • tossing
  • catching
  • passing
  • kicking
  • rolling
  • making a basket (whether with little basketball hoop or even a laundry basket!).

Note: I use balls in the house because Andrew is not very strong with his ball skills. I say this because if he were a child who could really kick or throw, I would probably not use kicking or throwing as a station. (I saw a child at Andrew’s sports league the other day who I fully expect to see punting field goals for the pros someday with his kicking ability at age 5!) If this is the case in your house, you don’t have to scrap incorporating balls altogether. It could be used along with math facts or spelling words as a passing or rolling back and forth activity. (ex. “treat” “t” – pass/roll, “r” pass/roll, “e” pass/roll, “a” pass/roll, “t” pass/roll or you: 5+2= (pass/roll), child: 7 (pass/roll) )

Engage, Encourage and Empower!
Preparing For An October/Halloween My Obstacle Course

Today I am sharing an example of what it looked like when I was preparing for an October/Halloween themed My Obstacle Course done with Andrew.

Prepping for an October/Halloween Themed My Obstacle Course

Below is a photograph of my desk while I got organized. This is how I play!! While it may seem to be just a mish-mash of things, they all went together beautifully to create a fun learning experience.

Prepping by gathering materials to see what I have.

I gathered cutouts, stickers, thematic materials and other tools that I had which would help me build skills. I’ll do my best to go from left to right describing the item and how I used it. (I will be posting the ones I haven’t published yet in the next two weeks.)

  • Yellow Geoboard with rubber bands to build fine motor skills while creating a spider.
  • Colored cups (leftover from Easter egg dying) with Halloween rings used for sorting and counting.
  • Alphabet stamps and stamp pad to build fine motor skills while spelling words to go with our theme.
  • Write on – wipe off alphabet writing book with dry-erase markers to help with letter formation.
  • Leaf cutouts to make opposite matching game.
  • Halloween stickers for patterning activity, “What Comes Next?”
  • Autumn themed number cards to play, “Make This Number.”
  • Some counting activities from www.EnchantedLearning.com (the white papers with black background).
  • Farm themed memory match game.
Note: These nine activities actually got broken up into about 13 stations since I consider things like sorting and then counting to be separate stations and I also usually separate patterning into two stations using different stickers or different patterns. I’ve had people say that they could never set up that many stations but once you look at it like this, it is not that difficult.

After this, I gather up the larger items like tunnels, carpet runner, balls, clothesline and clothespins. It only takes a little while to set up because I use the same station locations each time so I just have to scatter the activities so I have a good mix of skills and also plan to put preferred activities after activities that are more challenging. This helps to motivate him to finish so he can move on.

With some really simple materials, you can create an engaging experience with your child that will provide you with so much information about how they learn and what they know and can do while your child gets to build the skills that they are ready for at the level they need.

Engage, Encourage and Empower!

Farm Themed Station Ideas Using Items Found At Home

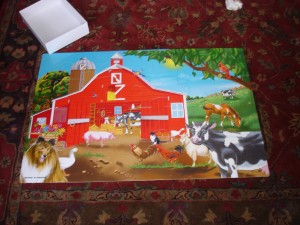
These are some other basic station activity ideas that I have included in a farm-themed My Obstacle Course for Andrew. The great thing about them is that I used things that I already had at home so this is another reminder to look around in your child’s stuff to see if they have toys that fit with the theme you are doing. When doing my own “treasure hunt” for this theme I found a farm puzzle, his Fisher-Price Farm set with the animals, some plastic animals we accumulated somewhere (possibly Michael’s), and some farm-themed books.

Farm Puzzle

Large Farm Puzzle

Puzzles can be done in a variety of ways, depending on what your child is ready for.

  • Put the puzzle together ahead of time and remove several pieces. When the child gets to the station, they put the pieces that have been removed into the puzzle. This helped us tremendously because Andrew would get overwhelmed at all of the pieces in front of him, not quite getting how to look for edges and corners. When he put the pieces into the puzzle, he felt as proud as if he had done the whole thing and the next time I would remove a few more pieces to challenge him a bit more.
  • Separate the edge pieces from the middle pieces. Create the frame first before strategically introducing the other pieces. With beginner type puzzles, this is not difficult to do. Just look for pieces that fit in the spaces next to the edge pieces and hand them to your child.
  • Complete puzzle in the typical fashion.

Fisher Price Farm

  • While this is meant for more pretend play, you could make it a more direct activity by having your child place the animals in their correct spaces, having them make the sounds that the animals make or match the animals with the animal name written on a card or cutout. For these, I would probably incorporate some sort of mystery pouch so that they have to reach in, choose an animal and then do the activity. Doesn’t take much to make it more intriguing! Here is a post I did a while ago on mystery pouches.

Plastic Farm Animals

  • Provide clues for the animals that you have and have your child match the animal that goes with the clue. (Ex. What kind of animal likes to roll in the mud? Pig!) I would use the same mystery strategy I mentioned above.

Farm Books

  • Books can be read as a read aloud (where the adult reads while the child listens or vice versa), read together (adult and child read together or take turns reading pages) or talk about the pictures and point out things on the pages without reading the text that is on the page. This can be as easy as saying, “Where is the barn?” or “Point to the cow.” Include some post-it notes so you can label these items (without ruining the book) to add word and picture connections.
I encourage you to go on your own treasure hunts and see what you can find. Remember that things don’t always have to be used in the way they were originally meant to be used. Get creative! Think simple! Remember to meet your child where they are and build the skills they need.

Engage, Encourage and Empower!

« Previous Page
Next Page »

Primary Sidebar

Obstacle Course Mom’s Blog

  • When People Stare, Mind Your Own Business
  • ABC’s of Peaceful Parenting Tele-class
  • What’s Perfect About This?
  • Exciting News!
  • Halloween

Categories

  • Blog
  • Cool Tool
  • Fine Motor
  • Getting Started
  • Gross Motor
  • Literacy
  • Math
  • My Obstacle Course Station Ideas
  • Oral Motor
  • Problem Solving
  • Sensory
  • Social Skills
  • Uncategorized

Archives

  • July 2012 (1)
  • May 2012 (1)
  • January 2012 (1)
  • November 2011 (2)
  • October 2011 (12)
  • September 2011 (14)
  • August 2011 (15)
  • July 2011 (19)
  • June 2011 (18)
  • May 2011 (21)
  • April 2011 (20)
  • March 2011 (22)
  • February 2011 (19)
  • January 2011 (21)
  • December 2010 (22)
  • November 2010 (6)

Meta

  • Log in
  • Entries feed
  • Comments feed
  • WordPress.org