• Skip to primary navigation
  • Skip to main content
  • Skip to primary sidebar

My Obstacle Course: Engage, Encourage and Empower

A fun, structured, systematic way to work on your child's strengths and weaknesses at home!

  • Welcome to My Obstacle Course!
  • What is My Obstacle Course?
  • Developmental Timelines
    • What Is My Child Ready For?
  • About Us
  • Blog
  • Contact Information

Obstacle Course Mom

Building Hand Strength with Frosting and Food Coloring

I was looking for ways to build Andrew’s hand strength, particularly the muscles that allow the hand to squeeze and squash things. I have shown how I’ve used frosting in a cake decorator (Cookie Cutter Decorating) to work on this and was particularly excited about his interest in making colors with food coloring and thought about combining the two. Knowing that he doesn’t really like to get his hands sticky (neither do I!) I turned to one of my favorite items for containing messy things – the Ziploc bag.

My Obstacle Course Station Activity: Squeeze the frosting to make new colors.

Station Activity Set Up:

I scooped some whipped frosting into the bag and placed some drops of food coloring, strategically scattering them around so they wouldn’t all be clumped in the same spot. For this particular station activity I choose yellow and blue food coloring because it was March and I wanted him to see how those two colors make green. With the prep work done for this (another easy station to set up – time spent, probably less than a minute!) it was ready and waiting for My Obstacle Course to begin.

My Obstacle Course Station Activity: Squeeze the frosting to make new colors.

At The Station:

When he got to the station, he read the directions that he was to squeeze and squish the frosting so the colors would mix or combine. I demonstrated how to do this and showed how he could lift the bag and squeeze the frosting to move it around. He pushed and pressed, made a fist and pounded the frosting. It was hard work for him but he was also so excited to see the colors changing as the mixed in, first turning the frosting yellow and blue in sections and then mixing to make green. I loved it because it was really working his little hand muscles without him getting upset or bothered by sticky frosting on his hands. (Working on sensory tolerance for the stickiness is a station on its own, one done right at the sink 🙂 . But my goal for this activity was to build fine motor, hand strength.)

When you are done, the bag of colored frosting does not have to be disposed of just yet. It can also be used to build beginning handwriting skills…


(Colored frosting in Ziploc bag)

the same way I showed with No “Ick” Finger Painting! Your child can practice making shapes, letters and numbers in the colored frosting while also building finger and hand strength.

Engage, Encourage and Empower!

Calendar Numbers – Not Just For Calendars!

I was strolling through the aisles of my local teacher supply store (One of my favorite things to do! What can I say? Some people love to browse for shoes and clothes, I love to browse for educational supplies! 🙂 ) and noticed that there was a whole section devoted to calendar supplies, especially thematic calendar numbers. Obviously, I knew that they carried these materials, I just hadn’t thought to use them in a different way. I guess that’s one of the many things that Andrew has taught me – think outside of the box a bit more and don’t assume there is only one way to do something or use something!

At the time I was working on numbers and number order with Andrew and didn’t really need to go any higher than 31, so I picked some up. Once I got them home and started playing around with them, I got all sorts of ideas. This is just one way I have used them as part of My Obstacle Course. The activity is so simple and easy to set up and yet your child is working on building an essential mathematics skill.

Calendar Number Idea #1: Putting Numbers In Order


How to set up the station: Select a group of numbers that your child is familiar with but also may be challenged by them not being in order (ex. 1-10, 10-20, or 20-30. You could also set out a smaller group if 10 is too much.). Set out the first and last number and place the other numbers below, all mixed up (see photo below for example). Note:  This can be done putting numbers in order from least to greatest and also greatest to least.

My Obstacle Course Station Activity: Put the numbers in order from 10-20. Read and point to them when you are finished. (March themed calendar numbers)

Instructions:

My Obstacle Course Station Activity:

  • Look at the numbers set out.
  • Look at the first number, find the number from below that comes next.
  • This is a great opportunity to model and encourage talking and thinking out loud. This is one of the benefits of reinforcing things at home, they don’t have to worry about disturbing the child next to them and you get to hear how they are thinking. Example:  Parent: “What is the first number?” Child: “10.” Parent: “What comes after 10?” Child: “10, 11.” Parent: “Yes, 11 comes after 10. Can you find the number 11?”
  • Continue until all of the numbers have been placed in the correct order. Read the numbers in order when completed.

My Obstacle Course Station Activity: Put the numbers in order from 15-25 (Apple themed calendar numbers used in September)
Working to put the numbers in order.

Easy and Informative

These make it so easy to reinforce and build on the math skills your child is ready for and also allows you to see firsthand if they are understanding math concepts. You are able to see in a matter of minutes what they have mastered and where they are struggling. This information can then be used to create future stations that build on skills where and how they need.

I have also found this sort of activity really helpful when meeting with evaluators and teachers because I could share with them specific examples of what he was doing in an environment where he wasn’t anxious and didn’t have to use intelligible words to show what he knew by doing this activity.

Stay tuned for future posts on more ways to use these thematic calendar numbers.

Engage, Encourage and Empower!


Easy Theme Reinforcers – March

One of the main reasons I came up with My Obstacle Course was to find a way to engage with Andrew at home while doing reinforcement activities for therapies and school. I found that utilizing a theme for each Obstacle Course allowed me to work on skills in all developmental areas while being purposeful and meaningful for him. The themes can range from a general monthly theme to a specific theme that is reinforcing what your child is learning about in school but what they do is help to tie all the different stations together.

Easy Ways To Reinforce A Theme:

I have had many people comment that it must take a great deal of time to prepare the activities and while it does take a little time and preparation (most of which I hope to make easier for you through my posts!), there are so many easy ways to make activities thematic. For example, it is March and so for the entire month (even after St. Patrick’s Day) I use thematic helpers like shamrock shaped calendar cutouts.

Memory Match game made from shamrock shaped calendar cutouts.

I also gather up anything green (or whatever goes with the theme) that I can find that can be used, such as…

  • a green ball or balloon for bouncing, tossing, catching, kicking, rolling, etc.
My Obstacle Course Station Activity: Pass the green ball back and forth 10 times.
  • green ink for my letter stamps
My Obstacle Course Station Activity: Alphabet stamps with green ink.
  • “Green Eggs and Ham” by Dr. Seuss for a reading or listening station activity
My Obstacle Course Station Activity: Read "Green Eggs and Ham" by Dr. Seuss
  • green dice to roll for number identification, addition, subtraction, multiplication – Link to previous post on dice.
  • green markers or crayons for drawing, texture rubbings, letter, number or word writing practice
  • green Duplo blocks for fine motor skill practice by putting them together or pulling them apart
  • blue and yellow food coloring in water to be combined to make green with dropper or baster – Link to previous post on using droppers.

These easy to put together station activities, along with other ideas I share, make it easy to build skills he is ready for in a way that is fun, colorful and kid-friendly. I encourage you to go on a “green” hunt in your child’s toy box, cupboard or closet and you may be surprised at what you find that can be incorporated! Once I began doing that, I realized that I could use toys and tools in ways other than their originally intended purpose. It made things so much easier for me and also more fun for Andrew because while he might recognize the objects, he never knew how I was going to have him use them. I just love ideas that help me use the element of surprise to keep him engaged with me!

Engage, Encourage and Empower!

Greater Than/Less Than Using Sticker Cards

Here is a link to a previous post, Sticker Cards, that I did showing how to make what I call sticker number cards. These are modeled after a deck of cards but because I make them with stickers and colored index cards, they can be made quite easily to go with the theme we are doing in My Obstacle Course. I love ideas or things that I can make and keep to use in a variety of ways to expand on concepts and skills as his knowledge and abilities expand.

In the past I have used these cards to work on number order, one to one correspondence, “Make This Number” and addition. I was setting up a March themed course and after looking at things Andrew was ready to work on, I decided to use them as a visual aide in a station activity to see how he did comparing two numbers. When I first set up the station, I did not have the sticker cards but when looking at it I decided to include them so he could see what the number amount looked like. (You could also provide actual objects for them to count out. Any kind of manipulative works – dried beans, Cheerios, buttons, pennies, etc. If it can be counted out, it can be used as a manipulative!). I’m really glad that I put them out because he absolutely used them!

My Obstacle Course Station Activity: Decide if the first number is greater than or less than the second number. Flip the sticker cards over if you need help.

As you can see in the photograph below, I used calendar cutouts to write the numbers as well as the “greater than” and “less than” symbols (with words written out). There are several different ways to teach your children how to remember what those symbols mean. One way is to tell them to pretend that the symbol is a hungry alligator and always eats the bigger number. It also helps to read the numbers and symbol like a sentence that has to make sense. The sentence for the photograph below would read, “Six is greater than two.”


Sticker cards used as a "greater than," "less than" My Obstacle Course Station Activity.

Note: During my educational courses in college it was always emphasized to incorporate visual, auditory and kinesthetic aspects to each lesson taught to make sure each learning style is reached. I find that this is so helpful when providing reinforcement activities for Andrew, especially when he wasn’t speaking and I had no idea what he knew or how he learned best. It doesn’t take much and does not have to be super fancy but taking the time to provide a visual, auditory and something they can manipulate is well worth it! I hope you are seeing this through the station activities that I am sharing and as always, if you have any questions or would like me to post on a skill or concept you are working on with your child, please email me at obstaclecoursemom@yahoo.com or post on my Facebook Page at My Obstacle Course.

Engage, Encourage and Empower!
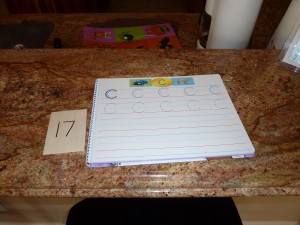
Handwriting Skill Building With Dry Erase Books

My Obstacle Course Station Activity: "Write and Wipe"Â Book - Practicing Uppercase "C"

This is for those of you who either have children that actually enjoy working in workbooks or have children who are ready build handwriting skills yet are reluctant to practice with paper and pencil. I do not have a child who loves working in workbooks but I was one of those children. I loved doing workbooks! Anyways, I found these dry-erase/wipe-off books at Lakeshore Learning to help Andrew with handwriting. He was not into them at the time I purchased them a few years ago but I brought them out again recently when he was showing an interest in his dry erase board. (Just another example of remembering to reintroduce things he wasn’t ready for!)

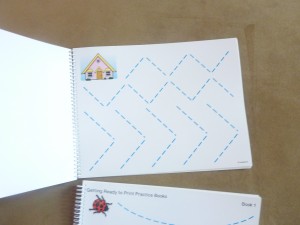
Dry erase books to build skills necessary for handwriting, such as making curved, vertical and horizontal lines.
A sample page to work on drawing diagonal lines (necessary for letters like k, v, w, x, y and z).

This series of books guides them through the basic skills necessary before introducing the letters and numbers. They are the perfect bridge between tools like Aqua-Doodles, MagnaDoodles and paper/pencil.

This sort of activity is also great for children who have a hard time pushing or using pressure when writing with a pencil. The marker allows them to work on letter and number formation without requiring a great deal of pressure (that is important as well but is a totally separate thing) like a pencil or pen does.

"Write and Wipe" books for numbers, lowercase and uppercase letters.

There’s Just Something About Dry Erase Markers!

These books give children structure for these skills in a way that is not as intimidating since it wipes right off. This is a big deal for some children who are reluctant to write or draw because they realize that what they are putting down is not necessarily the way they want it to look. For a long time Andrew wouldn’t even try to draw or write, always asking me to do it or help him (which usually turned into me doing it anyway!) so it would be “right” in his eyes the first time. If I did convince him to just try, he would purposely draw it really big or make a scribble as if to say, “See?!? I told you I couldn’t do it! This sort of tool helps a great deal with that and made a huge difference for him when he saw he could just wipe a mark away with a tissue or paper towel. Made it into something that wasn’t a big deal to fix. Love that!!

Make Your Own

This type of activity is also something you could set up and do on your own without the book by using a sheet of paper with a sheet protector over the top. All you have to do is either draw or write the lines, letters or numbers that your child is ready for onto a sheet of white computer paper, slide the paper into a sheet protector and your child can use a dry erase marker and trace over. Wipe clean when you are finished and change out the paper to work on a something different! Many times I will look at books that are in stores to get ideas for how to build skills and tweak them so they are more interactive or kid-friendly (or  in our case “Andrew friendly” 🙂 ).

Using Within A My Obstacle Course

When including these as My Obstacle Course stations, I would choose one page or part of a page at a time, depending on what they are able to do.

Links:

Here are links to the Lakeshore Learning website:

Getting Ready to Print Practice Books

Printing Letters

Printing Numbers

Note: I have no connection to Lakeshore Learning, I am just sharing what I have found that has worked for us.

Engage, Encourage and Empower!


Balloon Tossing

This is an idea that I tried years ago as a My Obstacle Course station activity when working on ball skills but heard about it again last week from Andrew’s Occupational Therapist so I thought I would share. I began using balloons when it became obvious to me that ball skills were going to be difficult for him. I knew that a balloon would move much slower than a ball giving him more time to track and catch it. I could also have a few blown up, giving him an opportunity to choose the color he wanted to play with.

His therapist is using this with him now because they are working on making and keeping eye contact as well as tracking an object as it is passed between him and other therapists and children. He has to watch her eyes to see when and where the balloon is going to go. Clever and fun!

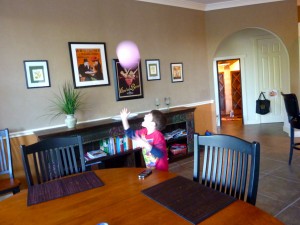
Here are some pictures of him tossing and catching the balloon at home. He had spontaneously come up with a game of it being a pink fly that was flying around the room. For us this is huge because he had major bug anxiety last summer and even a little bit of pretend play involving an insect is a big deal! He tossed the balloon up and ran around trying to catch it before it landed on the ground. So fun to finally see some of this sort of play!

I love how big his mouth is while catching this!

A colorful balloon is the perfect tool for this because it is bright and moves slower, giving more time to react. Balloons are inexpensive yet always tend to make something more fun and festive, which is another reason it is a great add-in for a My Obstacle Course.

Engage, Encourage and Empower!
 

« Previous Page
Next Page »

Primary Sidebar

Obstacle Course Mom’s Blog

  • When People Stare, Mind Your Own Business
  • ABC’s of Peaceful Parenting Tele-class
  • What’s Perfect About This?
  • Exciting News!
  • Halloween

Categories

  • Blog
  • Cool Tool
  • Fine Motor
  • Getting Started
  • Gross Motor
  • Literacy
  • Math
  • My Obstacle Course Station Ideas
  • Oral Motor
  • Problem Solving
  • Sensory
  • Social Skills
  • Uncategorized

Archives

  • July 2012 (1)
  • May 2012 (1)
  • January 2012 (1)
  • November 2011 (2)
  • October 2011 (12)
  • September 2011 (14)
  • August 2011 (15)
  • July 2011 (19)
  • June 2011 (18)
  • May 2011 (21)
  • April 2011 (20)
  • March 2011 (22)
  • February 2011 (19)
  • January 2011 (21)
  • December 2010 (22)
  • November 2010 (6)

Meta

  • Log in
  • Entries feed
  • Comments feed
  • WordPress.org