• Skip to primary navigation
  • Skip to main content
  • Skip to primary sidebar

My Obstacle Course: Engage, Encourage and Empower

A fun, structured, systematic way to work on your child's strengths and weaknesses at home!

  • Welcome to My Obstacle Course!
  • What is My Obstacle Course?
  • Developmental Timelines
    • What Is My Child Ready For?
  • About Us
  • Blog
  • Contact Information

Archives for April 2011

Summer Themed My Obstacle Course Finds

I’ve had a lot of people inquire about where I get my materials and seasonal items. I visit stores like Target, Michael’s and Walgreens because they have a lot of kid-friendly items that aren’t super expensive. I plan ahead so when they begin putting out items for the next season or holiday, I check out to see if there is anything to help me build the following skills:

  • Fine Motor
  • Gross Motor
  • Oral Motor
  • Literacy
  • Math
  • Social Skills

I also think about themes I want to do before I even enter the store. This helps me to notice items that would work and also helps to keep me focused!

In addition to doing My Obstacle Courses with Andrew, I love to share what I’ve learned as an educator and what I’ve learned from Andrew with other parents. This website/blog is one way I can do this but I also love to share in person. I am excited because I am having my summer themed My Obstacle Course session next week at Andrew’s school. This allows me to model for other parents some of the station activities I have that could help them build and reinforce skills specific to their own child’s needs. As part of my preparation for this, I visited Target and Walgreens to see what they had. I will share in this post what I picked up but you’ll have to check back to see how I plan to use them! 🙂

Finds from the Dollar Section at Target

Target’s Dollar Section Finds:

Water/sand wheel, sand play kit with sifter, velvet coloring pages, pop up ball catcher, dive rings, squishy ball and caterpillar that lights up and a beach ball.

Walgreens Purchases

Walgreens Finds:

Large squishy ball, dino-squeezers, frisbee, water blaster, water squeezers – truck shapes and fish shapes.

Looking forward to sharing my ideas with you!

Engage, Encourage and Empower!

Cootie Catcher

I received some wonderful materials from Creative Teaching Press and these “Cootie Catchers” were included.

Package of "All About Me" Cootie Catchers

Seeing this activity sent me back to elementary school days remembering when we would make these out of loose-leaf paper in order to determine who best friends were, who we were going to marry, and all sorts of  other goofy things. Creative Teaching Press has taken this idea and turned it into a fabulous way for children to get to know other people. (I also got a book with 20 different Math Cootie Catchers that I cannot wait to try out!)

Individual Cootie Catcher

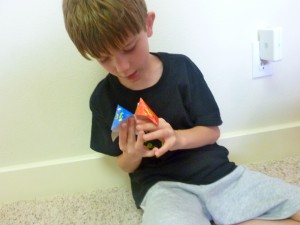
I was not sure if Andrew would be into this sort of thing but decided to give it a try, after all it would require some fine motor skills, motor planning and also allow us to work on social skills of asking and answering questions.

I know that Andrew’s ability to fold is not great, I wanted to introduce this to him without making folding the goal so I did it ahead of time. (It was really easy to do because the folding lines are already pre-creased so I just had to follow the directions.)

Cootie Catcher made and ready to go!
The other side, where the fingers go to open and close the Cootie Catcher.

My Obstacle Course Station Activity: Cootie Catcher “Get To Know Me”

We did not write the answers to the questions down on the paper but asked them out loud instead. We opened and closed the “Cootie Catcher” a certain number of times to see the different questions (5 seemed to work well) and chose the questions randomly until they were all answered.

I began the questioning and modeled how to open and close it for him. He did a great job and I was surprised by some of his answers. Just when you think you know someone, they have a new favorite food!

When it was his turn, we worked to get his fingers in the right places and I helped show him how to open and close it.

Not perfect with the finger placement but good enough to get the job done!!

I was so excited that he was really into asking me the questions. Not only that, he actually waited and listened to my answers!! I think the fact that he was concentrating on the opening and closing of the “Cootie Catcher” helped to focus his mind.

His turn to ask questions.

This comes as package of 30 (a class set) so it makes it a great material to share with friends, cousins or teachers once you’ve decided how many you need.

Personal Note: I have to say that seeing spelling errors in blog posts is a major pet peeve of mine and was pretty disappointed to find out by my husband this morning that I had spelled “Translator” wrong in yesterday’s post title. It is like fingernails on a chalkboard to me and I try really hard to make sure that I check, double-check and spell check things I publish. I wanted you to know that I was aware of this and have corrected it but you have my most sincere apologies for this mistake!

Engage, Encourage and Empower!

Computer As Translator

My last year of teaching, I had the blessing of having a child who was on the autism spectrum in my home room. At the time, I knew very little about autism but he taught me so much and I learned quite a bit that year that would later help me with Andrew.

This child was high-functioning, verbal and although he required very little one on one assistance, he would sometimes encounter challenging situations in unstructured settings like recess or PE. When this would happen, the teacher involved would usually come to me frustrated over the behaviors exhibited but I would get very few details leading up to the incidents. They had a whole class of students and couldn’t spend all of their time focused on this one child (I totally get that) but since the student was mine and was unable to tell me everything that had happened, I had to find out what was going on.

My instincts and experience with children told me that it probably wasn’t all this child’s fault and that there had to be more to the stories. I began sitting with that student at the computer (something they liked to do) and was amazed at what I would discover. It was so informative and helpful. Using the computer as an interpreter made all the difference in the world. Part of the reason it worked was because the computer screen doesn’t have facial expressions or social rules to figure out. I would type statements or questions and he would respond either by typing or speaking for me to type. Details would come out and quite often he was provoked by another student who was able to escape getting in trouble because they were more socially savvy. When we finished doing this, we could print it out and present it to the other teacher to empower the child with his version of the events. It gave him a voice and a means to stand up for himself. This did not excuse him of any behaviors that hurt or bothered other students but it gave me the chance to work on social stories for how to deal with this in the future. This also allowed me to work with the other students who were involved, let them know I knew what had happened and that they would also be held accountable for their actions or words.

This is just something that I was thinking about today and thought that it might be helpful to share.

Engage, Encourage and Empower!
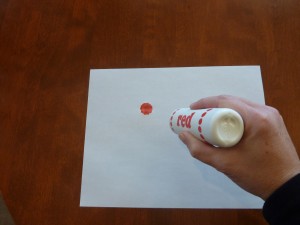
Do-A-Dot Art Station

Do-A-Dot paint markers provide a great way to quickly and easily get an art project together without worrying about getting a lot of paint on fingers, hands, etc. It also is a good way to build hand muscles by pushing and using pressure to make the dots on the paper.

"Do-A-Dot" Marker
Building hand muscles by holding and applying pressure to the marker.
Push the marker and get a circle of paint.


Do-A-Dot Smiley Face 🙂

My Obstacle Course Station Activity: Use the Do-A-Dot marker to make a spring picture with green grass, a yellow sun and orange flowers.

This took about 20 seconds to put together – a sheet of white paper and 3 Do-A-Dot markers. Instead of leaving this as a free form art project which tend to overwhelm Andrew, I gave it a purpose. I had him use the green marker to make grass, the yellow marker to make the sun and the orange marker to make flowers.

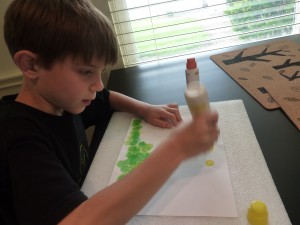
Making the grass...
and then the sun.
Some fun conversation while making the sun!
Seriously considering where to place the orange flowers.

This was the perfect little art project for someone who doesn’t really get into art projects. Quick and fun for him while producing a beautiful piece for me to hang!

Engage, Encourage and Empower!

Egg Tray As Math Organizer

Egg Tray For Adding/Subtracting/Multiplying/Dividing

Ok, so Easter is done but I have one more idea for how to use something you may have…an egg tray (you could also use an egg carton or ice-cube tray).

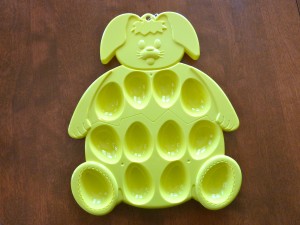
Egg Tray Math Organizer

I got this bunny shaped Egg Tray at Target last year and thought it would be perfect not only for drying the eggs after they have been colored but they would be a great math organizer for adding and subtracting up to 12. For these, I would use dice, playing cards or flash cards to come up with the numbers to add or subtract. (Previous Post on Easy Math Organizers)

Recently though, my mind has been thinking about introducing multiplication and division to Andrew. He found a “Brain Age” game on his DS and was asking what some of the multiplication and division equations meant. It’s time for me to introduce these concepts to him and as with any new concept, I want to begin by making it very concrete, using items that he can manipulate to help connect the abstract numbers and symbols with what they actually mean.

My Obstacle Course Station Activity: Making Groups Of Marshmallows (Introducing Multiplication)

Introducing multiplication using egg tray, colored marshmallows and 8-sided dice.
Counting out 8 x 5 = 40. We counted by 5's at first and then he double checked by counting them all.

I introduced this to him using dice that went up to 8 and while he did okay with it, the next time I will tweak it and make some flash cards to build understanding of one common factor instead of having it be so random. The flash cards I will make will start with common factor of 1 – 1×1, 2×1, 3×1, 4×1, etc., so that he begins understanding the “groups of” concept. We will build from there perhaps throwing in some previously mastered facts to reinforce his knowledge.

Building Understanding For Multiplication And Division

“Mom, we’re finally learning multiplication so I have to memorize all of these facts by tomorrow!” Ahhh…at first they are so excited, as though they’ve reached an important rite of passage. True, there are some children who are able to do this right away and “get” what the numbers represent without needing it broken down. Others are able to memorize the equations but lack the understanding of what they actually represent. This becomes obvious when story problems become difficult because they don’t quite understand what the question is needing them to do – add, subtract, multiply or divide. Then there are those who cannot seem to memorize them and have no tools to help them figure out what they are supposed to be doing.

I prefer to approach abstract concepts by encouraging everyone to begin with a firm understanding of what the concept means, what it looks like and how to “act it out” with manipulatives. This includes those who get it right away because it’s interesting to see how they approach it through actions. Many times they will bristle at this notion – Why do I have to do this? I already know it!”  This is good practice for working on explaining their methods and showing others about how they see things.

My last few years of teaching, we really emphasized to our students the importance of being able to show what they are doing through numbers, words and pictures (those of you who are familiar with the “Investigations” math series will recognize this.). Using a math organizer along with manipulatives replaces the “picture” making because your child is actually representing the equation with items. Their work IS the picture. This will give you immediate information on where your child is with regards to understanding what the symbols mean.

Building Multiplication Skills:

A multiplication sentence may read 4 x 3 = 12 to you, but when teaching my students, I emphasized that it really means 4 “groups of” 3 equals 12. It also represents 3+3+3+3=12 since multiplication is repeated addition.

Building Division Skills:

The same is true for division. 12/4=3 means 12 divided into 4 groups which gives you 3 in each group. When working on division, an organizer can really help your child grasp this concept. Being able to actually divide a given number into groups that must have the same amount.

Make It Relevant

To do this, I always found it helpful to connect it with food or money. Ex. For 12 divided by 4, I would tell them that they have 12 jelly beans that they have to pass out evenly to their 4 friends. How many jelly beans does each person get? They can do the “one for me, one for you, one for you” method until they have all been passed out, giving each person 3 jelly beans.

Using manipulatives, or items to count, when children are first learning math concepts can help them fully understand what they are doing, allows them to see what it looks like and connect that with the numeral representation of it.

Engage, Encourage and Empower!


Reusing Egg Coloring Cups

It’s Earth Day and I thought it would be nice to combine the practice of reusing with something you may have purchased in the past weeks – the colored cups that come with egg dying kits. Once you’re done coloring Easter eggs, the containers are perfect for using in My Obstacle Courses! They stack well for storing purposes and are bright and colorful. I especially like them because they keep things we are using at a station contained until we get there or they can be set out with labels as part of a sorting station. Here are some photos showing how I have used them over the past 4 years…

My Obstacle Course Station Activity: Sort the puffs into the same colored cup using a tweezers.

Colorful containers match colored puffs for station activity of sorting by color.

My Obstacle Course Station Activity: Sort the items

Containers used to hold materials and also provide a place to sort into.

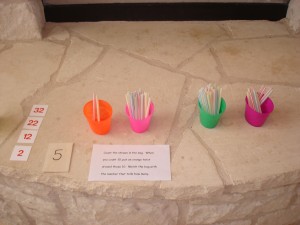
My Obstacle Course Station Activity: How many straws?

Containers hold straws for number/place value station.

My Obstacle Course Station Activity: Blow the puffs off of the counter into the cup.

Container perfect for holding puffs for "puff blowing" station.

If I haven’t done a post on the station activity, I will do so at a later date. Andrew is off today so I’m going to keep this short and sweet because we are off to do our own Easter themed My Obstacle Course! Have a great weekend!! 🙂

Engage, Encourage and Empower!
Next Page »

Primary Sidebar

Obstacle Course Mom’s Blog

  • When People Stare, Mind Your Own Business
  • ABC’s of Peaceful Parenting Tele-class
  • What’s Perfect About This?
  • Exciting News!
  • Halloween

Categories

  • Blog
  • Cool Tool
  • Fine Motor
  • Getting Started
  • Gross Motor
  • Literacy
  • Math
  • My Obstacle Course Station Ideas
  • Oral Motor
  • Problem Solving
  • Sensory
  • Social Skills
  • Uncategorized

Archives

  • July 2012 (1)
  • May 2012 (1)
  • January 2012 (1)
  • November 2011 (2)
  • October 2011 (12)
  • September 2011 (14)
  • August 2011 (15)
  • July 2011 (19)
  • June 2011 (18)
  • May 2011 (21)
  • April 2011 (20)
  • March 2011 (22)
  • February 2011 (19)
  • January 2011 (21)
  • December 2010 (22)
  • November 2010 (6)

Meta

  • Log in
  • Entries feed
  • Comments feed
  • WordPress.org