• Skip to primary navigation
  • Skip to main content
  • Skip to primary sidebar

My Obstacle Course: Engage, Encourage and Empower

A fun, structured, systematic way to work on your child's strengths and weaknesses at home!

  • Welcome to My Obstacle Course!
  • What is My Obstacle Course?
  • Developmental Timelines
    • What Is My Child Ready For?
  • About Us
  • Blog
  • Contact Information

Archives for December 2010

No Paper Or Pencils Required Here!

Fine motor skills, other than spinning small items like a dime, have been a bit of a challenge for Andrew.  I wrote about some handwriting helpers (markers, crayons and pencil grips) I found that help with finger positioning and I would also like to share some fun toys/tools he’s gotten that I’ve incorporated in My Obstacle Courses to help engage him in the writing/drawing process.

See Mom?  I DO Need Help!

It never failed, as soon as I would get out paper and writing tools, he would hold them for a minute and then say in his very weepy voice, “Help me Momma!  I need help.”  I would encourage him to try a little by himself but that would result in him scribbling something really big over the whole paper while looking at me, not the paper :), as if to say “See?  I DO need help!”  I tried hand over hand with him, which was a bit more successful but getting him to try it on his own was quite a challenge.

Toys As A Tools

One day I found his Doodle Pro in his room with some of his drawing on it.  I brought it down and used it the next time we did My Obstacle Course, taking turns to make shapes and different kinds of lines (a post coming soon on how to turn this into more of a game!).
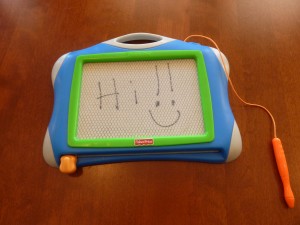
Doodle Pro

I found an Aqua Doodle at the store and tried it in another course.  Same thing!  No whining, no squirming to get away.  (I know that his willingness had little to do with it being part of My Obstacle Course because I had tried pencil and paper before and got whining and squirming.)

My Obstacle Course station idea: Aqua Doodle Word Writing (he's writing the word "spider" during an October Obstacle Course)

White/dry erase boards got thumbs up as well.

White board with dry erase marker (Be careful not to use a permanent marker! Â They look similar but only the dry erase will wipe off.)

What Is It About Paper And Pencil?

When I notice things like this, the teacher in me starts to analyze a bit.  What is it about these toys/tools that make this activity more tolerable to him?  What are his avoidance behaviors telling me when I bring out paper and pencil?  I thought about the difference between them and I think the main reason is that since the Doodle Pro (or Magna Doodle), Aqua Doodle and white boards are not “permanent” like pencil/paper (at least in his eyes) it was not as daunting.  It was no big deal to make some markings on them because they were easy to get rid of.  They were not permanent and if it didn’t turn out the way he wanted, he wouldn’t have to look at them for more than a few seconds.

Building Confidence While Building Skills

I think that if kids know that what they are putting down on paper is not the way they want it to look, they get frustrated and don’t really want to try anymore (kind of like me and baking!).  For Andrew, using tools that make the writing easy to “wipe away” helped him slowly build up his confidence.  By removing some of the pressure, we could focus on the basics of the skill.  Now he loves his big white board where he can draw people and fans (his two obsessions right now) because he has an opportunity to practice while being able to easily rub unwanted lines or marks away.
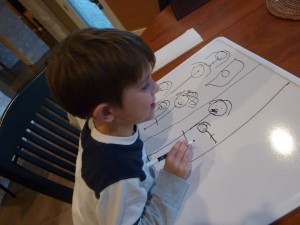
Happily drawing people on his white board

If you have a child who is reluctant to write or draw, I encourage you to think beyond pencil and paper.  A lot of what I’ve learned from my son has come from trial and error so don’t give up introducing skills or concepts in different ways because chances are eventually something is going to click!

Engage, Encourage and Empower!

Puff Blowing

I’m sure that I am different from many people in that I have spent a good deal of time thinking about a skill that children usually pick up early on – being able to blow air out of their mouth.  This skill usually comes naturally as parents model and teach their children to blow on their food when it is too hot.  Well, this was a skill that was very difficult for Andrew and no matter how much it was modeled and practiced he couldn’t get it.  I’m sure those of you out there with children who also have apraxia of speech can relate to this!  I could tell that he was trying to figure out how to get his mouth to do it but the air always came out of his nose.  He would cheer because he figured if he was making the same noise that we did when we were blowing, he was doing it.

His speech therapists worked on building this skill and since I was always on the lookout for ways to reinforce what they were doing, they told me to have him blow tissues or cotton balls across a table.  Great idea but it was too random.  Once I began doing My Obstacle Courses with him, I incorporated this activity in almost all of them and it became one of his favorites – something about the puffs falling over the counter’s edge cracked him up!

My Obstacle Course station idea: Puff Blowing (he had to blow the various sized puffs to the window)

A Tool To Help

Since it was difficult for him to get his mouth in the correct “o-shaped” position, we began with a straw.  This gave him a structure to put his lips around and the air he did blow through was aimed directly at what he was trying to move.  This is the same concept as using a pencil grip to help position the fingers where they need to be until the muscle memory is there.  I am all for tools like this!  We used a straw to blow out birthday candles and it gave him such confidence knowing that he could do it on his own.

This Is Just One Of My Favorite Things (I Can Hear Julie Andrews Singing!)

On my first shopping trip to find things to use in My Obstacle Courses, I found a package of multi-colored puff balls.  Now, most people would walk on by but not me!  They were and still are some of my favorite things to use because they were inexpensive but oh so durable and versatile.  I will do more posts on them because they can be used for many different activities.  Since they come in a variety of colors and shapes,  I knew I could incorporate lots of language and vocabulary building with questions like, “What color is that puff?  What color do you want to blow next?  What size is the easiest?  Which size is more difficult?  How many red puffs?  How many in all?”

My Obstacle Course station idea: Â Blowing Colored Puffs Off of the Counter

Puff Blowing Station:

  1. I would select the number of puffs I wanted him to blow
  2. I would provide either a cup/bowl/container for him to blow them into if we were at the counter or I would create a “finish line” out of tape, string or pipe cleaner that the puffs would have to cross.
  3. He would use the straw to blow the puffs.  I would ask him to blow specific colors or sizes to see if he understood and see if he could select the right one.  He didn’t need to speak to show he understood!
My Obstacle Course station idea: Â white puffs as snowballs for puff blowing

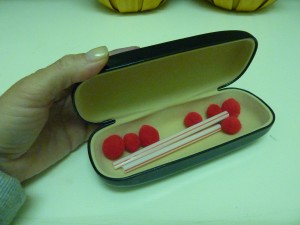
I love hiding station materials in bags or containers to add a bit of mystery as well as to work on fine motor skills like unzipping, pulling apart or prying open.  I found an old glasses case in a drawer and thought it would be the perfect house for my Puff Blowing station.  This is what it looked like open but when closed it could hold anything!

Eyeglass container with straw and puffs

By setting it up like this within the structure of My Obstacle Course, it became a purposeful task with clear instructions (“Use the straw to blow the puffs into the cup or across the finish line.”), part of the whole and in order to move on, he had to complete that task.

Eventually he got to the point where he could blow the puffs without the straw, so that part could be removed.

Engage, Encourage and Empower!

Make Your Own Tunnel

Andrew began getting OT (occupational therapy) services this year and it has made such a big difference for him.  I would sit in the waiting room and listen to the laughter coming from the kids and the therapists – what a fun job!!  One day they had me come back and Andrew was creeping and crawling through this stretchy tunnel and when he would get to the end he would come out with this huge smile on his face.  I love anything that gets him creeping and crawling and when I saw that smile, I knew I had to have one of those at home!

Professionally Made Sensory Tunnels Cost What?!?!?!?!

I did what most parents like me do when they see smiles like that, I got on my computer and searched to see if I could find one.  I found some sold at stores specializing in sensory tools and toys but was shocked to see how much they cost!  So, the next time I brought him to OT, I looked closely at the tunnels that they had, saw how basic they were and knew I could make one at home on my sewing machine.

I went to the fabric store, bought 3 or 4 yards of some stretchy, jersey-like fabric that was on the clearance table (didn’t matter to me the pattern or color) and some heavy duty thread.

Perfectly Imperfect

I am not a perfectionist by any means so when I got home and began to work, I decided to use clothespins instead of pinning the entire piece (If you are a perfectionist and need to pin it carefully, by all means go for it!  I just know that I don’t have the time or patience and realized that it wasn’t going to matter to either of us if the hem was a little crooked.).  The tunnel is not perfect but it works perfectly!!

Close up of the stretchy fabric with clothespins holding the two long ends together.
Pinned and ready to sew!!
My sensory tunnel with clothespins showing open ends on each side so the child can crawl through.
Sewing the hem for my sensory tunnel.

I sewed a hem about 2 inches in to create a  long tube.  I did go back and sew over my hem to make sure it would hold tight.  Once that was done, I turned it inside out so that the hem was on the inside.

I then gave it to Andrew to try out and…

Getting ready to creep and crawl through.
Andrew getting in and modeling the stretchiness of the tunnel.

he LOVED it!!  His very own tunnel at home.

A HUGE success!! Look at that smile 🙂 ! Â (Sorry for the blurriness but he just moves so fast!)

I have plans to make another one a little bit tighter to provide even more sensory input as he is crawling through.  The one we have now has enough room for him to do somersaults in – huge bonus for him!!  We have also used this like those stretchy body socks, positioning it so he is standing on it with enough tunnel to sit on top of his head while his arms can push against the sides.

Cookie Cutter Decorating

While I love to cook, I cannot bake.  When I say I cannot bake, I mean I really cannot bake, not even cookies you drop onto a tray. This has been an issue all of my life and whenever I get up the courage to try again, I always end up with cookies that are either still raw or very crunchy (my husband kindly refers to them as “cookie crackers”).  At first I thought it was the oven but when my mother came to visit she was able to bake cookies just fine.  I think it’s just me and I am fine with that.

Providing Opportunities

I tell you this because while “everyone” else was baking and decorating Christmas cookies with their children, we didn’t do that in our house. Now, I don’t beat myself up too badly because I am pretty sure that even if I did bake cookies, Andrew would have very little interest in helping me decorate for more than a minute.  What I feel strongly about is giving him the same opportunities as other children, I just have to structure it differently.  I knew that if I created a cookie decorating station as part of My Obstacle Course, he’d only have to engage in this for a short time but would still get the chance to experience this holiday activity.

Since I don’t bake, I don’t have a lot of baking tools so while I was at our grocery store I purchased a fairly inexpensive cake decorating kit with different tips on it (I think it was $2.99), some holiday shaped cookie cutters and some whipped frosting.  I decided not to get actual cookies to decorate (which you could) but figured I could have him use the cookie cutters instead.  The cookie cutters provide a specific place to put the frosting so he doesn’t have to worry about it looking one way or another and the task was specific – “Fill the cookie cutter with frosting.”  I placed a cookie sheet underneath the cookie cutters to create an easy to clean work surface but you could go one step further and use either a piece of waxed or parchment paper or a paper plate.

Memories + Skill Building

Once I got thinking about this I realized that in addition to getting the chance to use a different kind of tool, he was also going to be working through some sensory discomfort (frosting on hands/fingers and the sweet smell of the frosting) while working on fine motor skills (squeezing the plastic bag so the frosting comes out) and planning (moving his hands back to the top, squeezing the frosting back down when the bottom was empty).  Anytime I can find an activity that targets lots of different skills like this I am thrilled!!

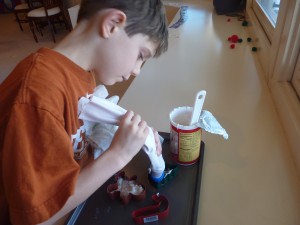
Cookie Cutter Decorating Station

My Obstacle Course station idea: Cookie Cutter Decorating

This was a very easy station to set up (the photograph above shows exactly what it looked like when we did it last week) and all I had to do was gather the materials.  I used the spatula to help scoop the frosting into the cake decorating bag and got some damp paper towels ready for him to wipe his hands when necessary.  He was very curious about this station and I first showed him how it worked, what to do and did some hand over hand to give him an idea of the amount of pressure needed to squeeze frosting out into the cookie cutter.  After that it was trial and error to figure out the best way to do it.

I am holding the top at first while he figures out how to squeeze the frosting to fill the inside of the cookie cutter.
He's not quite got it yet. Â His fingers are still sitting lightly on the bag, using very little pressure. Â I showed him how to squeeze with his fingers to get more frosting out of the bag.
Now he's got the hang of it! Note the change in hand position and the squeezed fists- great fine motor work!! Also note the wet paper towels nearby to help with the sticky frosting.
He is taking this task very seriously. It is something that has a beginning, an end and he knows what the expectation is - fill those three cookie cutters.

Extensions:

  • Change the tips of the decorator to compare and contrast them.
  • Use the decorator to make shapes, different kinds of lines (straight, wavy, horizontal, vertical, etc.), letters or numbers with the frosting.

Just A Thought: There are many things that we do that are a little bit different from other people and that is okay.  I always say, our normal is different from other people’s normal and when you think about it, everyone’s normal is different and that’s what keeps things interesting!!  Embrace your own normal today 🙂 !

Engage, encourage and empower!!

New Toys Not Played With…Now What?

It seemed like every year Christmas would come, I would go out, search for toys and find some that I thought would be fabulous for Andrew.  I tended to choose pretty basic things that had lots of possibility in my mind to build his pretend play skills.  He would open the toys and they would get set aside with all of his attention turned to the toys with on/off switches, music and lights.  My choices couldn’t compete but that was fine, I figured we had a whole week in the house together.  During this break from school, I would ask him if he wanted to play with a certain toy and his response was “No!” (if I got any response at all).  And so these toys sat…and sat…until I came to a realization, one that made a huge difference for me and perhaps can help you as well.

One day it occurred to me that perhaps the reason he has no interest in these toys is that he has no idea how to play with them.

Most children learn how to play with their toys by having someone playing with them, acting as the model for how to play.  This works great except for those of us with children who don’t want to play with us.  Since this was not an unfamiliar concept with us, I began to think, “Was there a way to incorporate some of these toys into an Obstacle Course so I could teach him how to play with them?”  You bet!

My Mental Shift

Now, in all honesty, I had to make some mental shifts because what we would be doing was different from the ideal in my head when I purchased the toys.  We were not going to be sitting for hours in the afternoon while we built carnival rides with “Magformers” but that was okay.  My goal shifted from getting him to play how I had envisioned to teaching him the basics of the toys he had so that maybe down the road he would use that knowledge to play on his own.

Start With The Basics

When I begin to work on a skill in My Obstacle Courses, I break it down to the most basic point that I know he can handle so I can build from there.  Teaching him how to play with these toys would be no different.  I had to look at these toys and think about the basics- what does he need to know how to do to put one part together?  Does he need a model?  Does he need written out directions giving him what to do step by step?

Make the Same

My Obstacle Course station idea: Make the Same with Magformers

I incorporated these ideas with an activity we had done before as an Obstacle Course station, “Make the Same” (click here to get more details and pictures of this) and it worked!  He got the exposure to the toys, their different parts and how to put them together so that down the road he would be able to build on those skills.  He had a model in front of him, the pieces he needed to make his own and me to help him when he got stuck.

I encourage you to look around for toys around your house that your child does not play with and see if you can break them down to be something very basic to build a play skill that could fill in a blank, one that may be preventing them from playing with something they actually want to play with!

Gingerbread Man Activity- No Baking Required!

This past week, with the holiday season upon us, I have noticed things related to gingerbread men and gingerbread houses all around me.  It reminded me of an activity I did with Andrew in one of My Obstacle Courses.

One of my favorite websites to get thematic ideas and printable materials is www.enchantedlearning.com.  I don’t usually use the print outs as they are unless I am working on a specific skill but I do like the literacy and math skills that they help build.  To make it more kid-friendly and interactive, I like to use thematic shapes and/or colored index cards, cutting and pasting the words and/or pictures on to create a matching activity.

Gingerbread Man Story- Matching Words with Clues

Words cut and pasted onto index cards cut in half.
Word clues cut and pasted onto precut gingerbread men.
My Obstacle Course station idea: Clothesline Clipping words with their clues

I used this as a clothesline clipping activity to incorporate fine motor skills with a literacy skill but it could also be used along with “Crawl and Match” or “Climb and Match” to combine literacy and gross motor skills.

Next Page »

Primary Sidebar

Obstacle Course Mom’s Blog

  • When People Stare, Mind Your Own Business
  • ABC’s of Peaceful Parenting Tele-class
  • What’s Perfect About This?
  • Exciting News!
  • Halloween

Categories

  • Blog
  • Cool Tool
  • Fine Motor
  • Getting Started
  • Gross Motor
  • Literacy
  • Math
  • My Obstacle Course Station Ideas
  • Oral Motor
  • Problem Solving
  • Sensory
  • Social Skills
  • Uncategorized

Archives

  • July 2012 (1)
  • May 2012 (1)
  • January 2012 (1)
  • November 2011 (2)
  • October 2011 (12)
  • September 2011 (14)
  • August 2011 (15)
  • July 2011 (19)
  • June 2011 (18)
  • May 2011 (21)
  • April 2011 (20)
  • March 2011 (22)
  • February 2011 (19)
  • January 2011 (21)
  • December 2010 (22)
  • November 2010 (6)

Meta

  • Log in
  • Entries feed
  • Comments feed
  • WordPress.org